Tuesday, 30 April 2013

Living Below the Line - Day 2

Day 2
James didn't start the day great as he didn't get up with enough time to make his breakfast. Thankfully Joey was excited to have 'jammy porridge' again this morning. I'm not sure how excited he would be if he had to have this EVERY morning though.
Joey got a treat for his lunch today, eggy bread. I couldn't afford it for me, but he had money to cover the cost of an egg, and he loved it. Me and James stuck to lentil soup, and I have the second batch on the go at the moment for the next few days lunches. I'm fortunate that I like soup, because I imagine for some having soup every day wouldn't be that inspiring!
Tonight we had the rest of the butternut squash curry and rice, which Joey enjoyed again. We're also fortunate that we don't have sweet toothes, and never normally have a pudding, because I would struggle to have fitted that in the budget. Tomorrow though I've snuck in a pudding that I know James and Joey will love - Pancakes!

Tonight is a training night for my upcoming 10k, so I wasn't sure how I'd be feeling. Having said that, our menu is carbs, carbs, carbs, so in theory I should have been ok! In fact it was fine, I actually felt really good (although it could have been due to the fact that there wasn't much wind tonight for once).

We also had our Bible study house group tonight, and made sure everyone entered into the spirit of the challenge by only drinking water, compared to the usual teas, coffees and cakes we'd usually have! Hopefully we might be able to get some more sponsorship when people see how hard James is finding it (he has somewhat of a reputation for eating!). He also made it seem like I'm forcing him to do it...which I am!

I must admit when you can't have something you want it more, and tea is calling out to me from the kitchen :(

But at least I know that on Saturday I can eat and drink whatever I want, something that people living the line don't have to look forward to.

Here is the recipe for the delicious curry, which I make regularly even when not doing this challenge!

Butternut Squash Curry Recipe - serves 5
1 Large butternut squash                   89p
1x 400g tin chickpeas                       39p
1 x 500g passata                               29p
1 red onion                                       10p
2 x chicken stock cubes                       3p
1 heaped tbsp curry powder                10p
Total                                                180p
Portion                                                36p

Instructions
1. Peel and chop red onion. Dry fry for 2-3 minutes.
2. Peel, deseed and chop butternut squash, add to pan and continue to fry for further 2-3 minutes.
3. Add passata and curry powder to pan with the 2 stock cubes, made up to 450ml with boiling water.
4. Bring to boil and cook for 10 minutes.
5. Add chickpeas and simmer for 20-25 minutes until squash is cooked.
  

Todays costs

Breakfast
50g Porridge with Jam- 11p

Lunch
Lentil soup 13p
2 slices Bread 5p

Snacks
Crisps 6p
2 custard creams 2p
Banana 11p

Dinner
120g Rice 5p
Butternut squash curry 36p
1/2 naan 9p

Total 98p

If you'd like to sponsor us you can do it here

Monday, 29 April 2013

Living Below the Line Day 1


Today is day 1 of 5 Living Below the Line.

Todays costs

Breakfast:
50g Porridge with Jam- 11p

Lunch:
Lentil soup 13p
2 slices Bread 5p

Snacks:
Crisps 6p
2 custard creams 2p

Dinner:
120g Rice 5p
Butternut squash curry 36p
1/2 naan 9p (I bought these a few weeks ago and froze them when they were reduced)

Total 87p


Lentil Soup - Serves 4


Ingredients:
200g yellow split peas                                     23p

200g Asda Smartprice frozen mixed veg           15p
3 Tesco value chicken stock cubes                    5p  
1 red onion                                                    10p
Total                                                             53p
1 Portion                                                       13p

Instructions:
1.Rinse split peas under cold running water until it runs clear.
2.Finely chop onion and dry fry for 2 minutes.
3.Add frozen mixed veg and fry for further 2 minutes.
4.Add 1.5litres boiling water to stock cubes and add to vegetables in pan and add split peas.
5. Boil rapidly for 10 minutes, then simmer for further 30 minutes until split peas start to break down.
6. Eat and enjoy!

The lentil soup is really nice and when padded out with 2 piece of toast (no butter!) really filling. I haven't felt hungry today, but I have had to stop myself from reaching for stuff thats around the house!

Monkey has been harder than I thought he would be to please. For lunch he didn't want soup, instead he wanted a cheese sandwich, his staple lunch, but I had to explain we had no cheese (we definitely couldn't afford that!), then he asked for ham, another no-no. Eventually I tempted him with a jam sandwich, something in budget, and also in the house! Thankfully I know he loves curry, so tonight he told me how delicious dinner was! The Butternut squash curry recipe will be in tomorrows post.

Day 1 has gone ok, but I really wanted a cup of tea mid afternoon, and settled for a cup of hot water instead.
Think tomorrow is going to be harder than today!

Don't forget you can sponsor us here.

Sunday, 28 April 2013

Preparing to Live Below the Line

Tomorrow is the start of our 5 days Living Below the Line. 5 days where we will live on only £1 worth of food each. This weekend we have been clearing out the fridge of any fresh things that we're not allowed during the week (either they aren't in budget, or not on my shopping list of meals we can afford to cook) and are now ready to start the week!
I have just made the lentil soup we'll be having for the next couple of days. I chose not to make it all in one go as this was the first time I'd tried this recipe, and wanted the opportunity to tweak it if necessary. I have to say its yummy! I'll be posting the recipe tomorrow.
Here's our shopping for the week. (and a cheeky monkey snuck in the photo!)

As you can see there is an awful lot of Smartprice stuff. I have to say I have no issue with buying smartprice/Tesco value things normally. For basic ingredients I think there's little difference in quality really, and if you can cook you can make something nice anyway. I did feel quite strange filling my trolley with almost all smartprice things. But as I looked around at others shopping I noticed a few people in the same boat as me, and yet I don't think they were doing this. I think that's the way they have to shop. One thing I take for granted is my choice. I choose to buy which brands I want, and have the choice of Smartprice if I want, or I can have the supermarket brand, or even a named brand. This week I didn't have that luxury.

Here's a list of our purchases and total cost.
Quantity Food Shop Price
6 Onions Aldi 69
6 large Eggs Aldi 100
1kg Porridge Asda 75
2l Milk Asda 100
2 loaves Bread Asda 100
454g Jam Asda 29
5 Bananas Asda 62
12 packs Crisp Asda 66
1kg Rice Asda 40
3 Naan Asda 54
4 Yogurts Asda 33
3x500g Passata Asda 87
500g Yellow Split peas Asda 58
30 Biscuits Asda 31
450ml Ketchup Asda 28
1 pack Pancake batter Asda 7
400g Tinned sweetcorn             Asda 32
1kg Mixed Veg Asda 75
250g Pasta Asda 19
500g Mince Asda 155
14 packs Raisins  Quality Save 79
400g Chickpeas Quality Save 39
2 packs Stock Cubes Tesco 30
1 Butternut squash Aldi 89
Total 1457

As you can see most shopping is from Asda, and interestingly I price checked most stuff that Aldi do with Asda and they're the same for things like pasta, rice, passata etc. Fresh veg is definitely cheaper at Aldi though, but not bananas (think most supermarkets do them as a loss leader). The only thing I bought from tesco were stock cubes (Asda and Aldi don't do basic stock cubes) and the cheapest place, by far, to get chickpeas was Quality save/Home bargains. They were only 39p compared to Asda 64p. We have 43p left  in theory, but I'm using some curry powder and spices in the curry and some garlic in spag bol, so will need to account for that too.
I'm going to miss my cups of tea, but can't afford another carton of milk!
If you'd like to sponsor us then you can do it on the Live Below the Line website here.
We're supporting Tearfund.

Tuesday, 23 April 2013

Waltzingmouse Flower show CASE


Today we are CASing cards from the recent Waltzingmouse Flower Show.

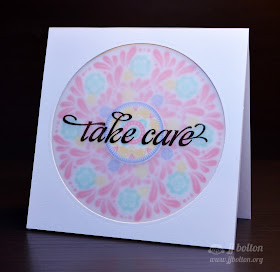
 I knew when I was looking through the cards that I wanted to CASE JJ Bolton, and had trouble choosing between the two cards she had made, but eventually I settled on the vellum one.

  here is JJs original here


I started off by stamping the main image from Folk Medallions in a rainbow of colours (I do love rainbows!). I then cut a circle in the centre, using circle nestabilities, which would make the centre of the card visible.
I stamped a red medallion onto a piece of white card which would sit inside the card underneath the main medallion and be seen when the card was closed.

Here's how it is when it's open. You can see some of the glitter in the vellum too.
I used my silhouette to cut the black cardstock to the shape of the medallion.


Here's how it looks when its closed.


I added some Fantastic Ribbon rainbow ribbon and a Paper Smooch sentiment (Simply Said) which was stamped in versamark and used Wow extra fine white embossing powder.

Here you can see the inside of the card with the small medallion.

I hope you like my take on the original :)

Wednesday, 17 April 2013

Waltzingmouse April Blog party - Spring Flowers

Blog-Party-Logo 70%25
For this months blog waltz I was so excited as I have two new Waltzingmouse sets which I got for Mothers day! Even more exciting was that both sets had stamps I could have used for the theme!

I chose to use Vintage Garden Flowers and stamped the Hyacinth. 


I used kraft card, stamped in Adirondack Expresso ( I tried using Walnut Stain distress ink, but it wasn't great for this as its a very fine stamp). I stamped the sentiment from a free set of Chronology stamps I got on front of a Docrafts magazine a couple of months ago.


I then used a cute antique brass key with Love on it (the card is an engagement card for one of my lovely Uni housemates) threaded through some Fantastic Ribbons twine.

I rounded the corners of the card and then sponged the edges with walnut stain distress ink and layered onto the kraft card case. As a finishing touch I also stamped the Hyacinth onto the envelope for a little extra touch.

I hope you like my spring flowers, and if you'd like to see others taking part hop over to the Waltzingmouse blog.


Monday, 15 April 2013

Wedding A4 Papercut

Have you ever made something and you just can't seem to get it right (a card, scrapbook page, item of clothing, cake)? Well this project had that kind of feeling. Everytime I thought I was just finishing it...something happened.

It all started when I decided that instead of just making a personalised card for a couple of friends getting married I would go the whole hog and make their present too. About a week before the wedding my plans were hampered by my silhouette portrait conking out (a problem with the power cable, Graphtec did a great job of sorting me out a new one, and some Online Silhouette vouchers for my troubles!) and so I wasn't able to get it done in time for the wedding, but undeterred I continued!
So I created the design and cut it...but I wasn't sure if I wanted it white or kraft...so I cut both. White with a kraft paper behind was my decision, so next I decided to distress it...until my husband came over and said "you've got fingerprints on it" and I said "thats the inking"...."oh". Unsurprisingly I thought I'd better start again...but I'd run out of kraft card, so after cutting it (again) I had to stick my (un-inked!)cut onto some kraft wrapping paper which I'd attached to some plain card to give it a bit of body.
Unfortunately the following day I noticed the whole thing had crinkled because the kraft paper wasn't substantial enough. cry.
So I set about cutting it a 4th time (thank goodness I didn't hand cut it!), and still not having any kraft card I improvised again with a cardboard box. Then I couldn't decided whether to attach it directly to the card, or raise it up on foam pads for dimension.
Top Row:
Left: Design cut from kraft paper. Middle: The remnants on the carrier sheet waiting to be removed. Right: 3rd attempt on kraft paper which crinkled.
Bottom:
Left: The distressed 1st attempt. Right: FINAL 4th attempt!

I actually HATE being a perfectionist sometimes, I really need to be able to accept things that aren't perfect...but this wasn't just a nice card, this was a framed gift, and perfection was what I was aiming for.

FINALLY, I had a cut I was happy with, mounted in a way which showed off the cut.


And I'm sooooo pleased I can just give it to the happy couple and not think about it anymore. Plus I don't have to clear all the waste of my carrier sheet for a 5th time!!
Have you ever had a never ending project?!!

Thursday, 11 April 2013

Could you Live Below the Line?


So in a few weeks we will be taking part in a global charity project called Live Below the Line, trying to see what it's like to live in extreme poverty. The challenge is to spend just £1 a day on food ($1.50 USA) for 5 days. For the full challenge rules look here.
The aim is to educate people to the severity of living on such a low income, but also to raise money for charities working to eliminate poverty around the world.

I have a friend who took part last year, and to be honest had written off taking part because of the kids, but when another friend who has 2 kids of her own said she would be taking part I knew that I should look into it a little more.

I decided that although it will be tough, it is doable, but I'm not including Elijah, as he's only 9 months and is only just weaning.

So between me, DH and Monkey we have a £15 budget for 5 days worth of food.

I, being the maths geek I am, have put together an Excel spreadsheet charting every person, for every meal, with formulas for calculating the costs!

So far the basic plan is this:
Breakfasts every day will be porridge, lunch will be vegetable and lentil soup with bread (although Monkey will be having eggy bread or spaghetti on toast) and then for dinner we will be having:
Butternut squash curry for 2 nights, Spaghetti bolognese for 2 nights and egg fried rice for one night.

What I'm already noticing when planning is that carbs are cheap, so we will be filling up on lots of bread, rice, pasta etc. Unfortunately it isn't a particularly nutritious menu. I'm cooking almost everything from scratch, and there are some veg and lentils, but there's not a great deal of protein, and we're not getting our 5 a day, but fruit and veg are expensive, and I just can't get them in the budget (although Monkey has bananas, raisins, eggs and cheese in his budget!).

So over the next few weeks I'll update you on how the planning goes, and then I'll blog every day during the Live Below the Line week to let you know how we're coping.

If you'd like to support us in our effort to highlight world poverty you can donate to our chosen charity, Tearfund, here.

Perhaps you might consider taking part?

Tuesday, 9 April 2013

Have a Jurassic Birthday!


You know that feeling when you have an idea, make something and its just "wow!". Yeah, that!
I LOVE this card. I don't care if anyone else likes it (apart from the person its intended for!!) because it is absolutely what its meant to be!
When I was making a card a couple of weeks ago I was flipping through some rub ons and showing my hubby, and as I flicked past some dinosaur ones he said "oh, that would be perfect for my sister!". You see she's a HUGE Jurassic Park fan. I wouldn't even like to hesitate a guess as to how many times she's seen it. But it got me thinking. How could I make her a Jurassic Park card?
I set to googling it, and decided to use my new favourite thing, my Silhouette Portrait!
I decided to make a funny version of the logo and use a cute dino instead of the scary one! I also decided to change the name to the Happy Birthday sentiment.

I tried to find the font, and online it was suggested that African was the closest. I used www.dafont.com to download the font for free.
I also printed a sentiment inside the card using the African font. I never use inserts, but on a black card you don't really have an option!

I hope you like my card, I do, and I'm loving my Silhouette more and more!!

Saturday, 6 April 2013

Vintage Motorbike Card

Here is another card highlighting the wonder of the Silhouette!
I had some wonderful motorbike wallpaper from the Galerie Memories pattern book from my dad, and knew I wanted to use it along with my Silhouette. I tried to scan in the paper to trace it on the Silhouette software, but it wasn't clear enough, so I googled and found a free image that I could trace and amended it slightly so it wasn't TOO tricky to cut out (Even the Silhouette has limits!)
Some sponging, a sentiment and some polka dot background, and there you have it!


I hope you like it :)

Thursday, 4 April 2013

Homemade Cardboard box Pirate Ship

My son loves Pirates. His favourite film is Pirates in an Adventure with Scientists (think in America it was Pirates and a Band of Misfits) and he loves getting dressed up as a pirate in his Disney costume. For a while I've been promising him we would make a pirate ship for him to play with, and although he requested one he could plan IN, I managed to find a reasonably large box to construct with.
We gathered together all the cardboard we could: wrapping paper tubes, chocolate boxes etc.
I googled pirate ships and asked him which one we should try and make, and this was the one he chose.
We printed it off as a guide!

Joey isn't normally one for sitting down and colouring in, but he likes painting things!

And here is the finished pirate ship with Joey dressed in his pirate outfit!


I used brown poster paint mixed with PVA glue for the ship and some gold paint for the details.
I asked Joey what he wanted to name his ship....Pirate Captain! I tried to convince him another name might be better, but he was adamant!

I used some kids foam for the skull and cross bones (or as Joey calls it, the scallywag!) and I have a cuttlebug die for cutting out the skull (Joey helped crank the handle!).
I used about half a roll of masking tape to make the boat the shape it is!
Hope you like it, and are inspired to make something from Cardboard!