Monday, 29 July 2013

Pajama Party! - Kraft art folk Happy Days card

Welcome to the First Waltzingmouse Pyjama Party! 
It's a late night (UK!) blog party which replaces the Blog party/Blog waltz. I'll be honest, I'll miss the old format on the 17th, but I do welcome the broader range of the new challenge, as some months I was really struggling to find a way to play along, sometimes meaning I just wasn't able to, but the new format means that will be much less likely.
Personally I'm not a night owl, so will probably be one of the last to link up my cards, but hey ho!

I chose to do the In The Background challenge, and stamp one of the small Fold Art Medallion images.


Here is the card I made for a friend who is starting a new phase in her career and I wanted to let her know that bright days are ahead. I think Folk Art Medallions is one of my new favourite stamp sets from Waltzingmouse, and it's SO versatile. I stamped up the background super quick using Walnut Stain distress ink and it was straight forward using a grid acrylic block. I actually stamped straight onto the kraft card base. I then stamped the Folk Art Labels 25 onto some cream cardstock using more walnut stain and the sponged all the edges. The sentiment is from an old set of Banana Frog stamps, but they are now discontinued. A lovely chocolate brown ribbon edged in gold finished off this card.
I hope you like it, do check out the other cards over on the Waltzingmouse blog.

Saturday, 27 July 2013

W Week Fun

So this week was the first of the Summer holidays, and as it was the first time since EJ was born that I would have both boys 24/7, 7 days a week I decided I needed to get organised!
You see when Joey was in Preschool every other day I didn't mind him watching TV and doing as he pleased in the afternoons he was with me at home, especially since we were out in the mornings at play groups. Unfortunately play groups finish over summer, and so does Pre-school, so I didn't want him just wasting the summer away and us not doing anything other than watch Disney films and build a bit of Duplo! 
I also have a slight ulterior motive that I'm trying to get him more in to craft and baking, but shhush, don't tell anyone!
So I remembered reading, a long time ago, a blog written by a mum who home schooled her kids, and she went through the letters of the alphabet week by week and explored all the different things beginning with that letter. I remember thinking it was a great way of getting some structure, but allowing you to be flexible with what you choose to do.
I put all 26 letters of the alphabet in a hat and let Joey choose one...he chose W!
My mind went into over drive. What could we do?
I listed all the things I could think of beginning with W, and as, after all, it is the holidays, all the possible films we could watch beginning with W! (I eventually expanded this to include any film with a W character, as we only had Wall-e!)

I printed pictures of animals beginning with W, characters we like (Winnie the Pooh, Woody,Wendy,Wall-e, Wallace etc). We coloured some in.
We made Winnie the Pooh shaped cookies (with walnuts and white chocolate!), we went for a walk, went to see a windmill. Ate new W foods: Watermelon (didn't like), Waggon Wheels (didn't like!) and Waffles (unsuprisingly he liked these!).
But my favourite thing for this week was making a Whale (with a snail on its tail of course! Thanks Julia Donaldson!)

I'll be honest. 90% of the whale is my work. He stuck about 4 pieces of paper on before he'd had enough, and I had to plead with him to even paint it (but he was pretty good at the in the end!), but he absolutely loves it now its finished!
Here's a picture tutorial to how I made it!
We started with a ballon and some scrap paper which was shaped like the tail. We added paper using a 50/50 PVA and water mix. We then painted him (the last photo shows it stood in a jug to help stabilise it whilst we painted, otherwise it would have meant paint everywhere!). The blue paint is normal poster paint mixed 50/50 with PVA glue to make it more lasting, but the white paint is acrylic, as I was worried it would go muddy if I used poster paint. I used a Sharpie to add the final details


Here he is, proud as punch, and I'm sure he'll be telling everyone he made it!

He's already asked if next week can be W week too!

Sunday, 21 July 2013

Fantastic Ribbon Design Team Wonderful Washi objects!


This month the Fantastic Ribbon Design Team have been using Washi tape around the home. 
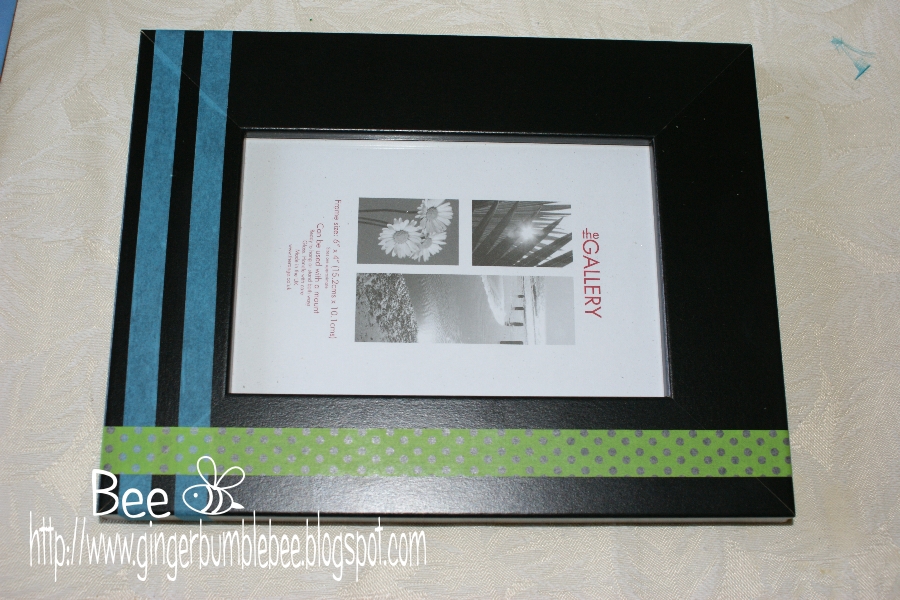
I know for me I love to see inspirational and aspirational projects, some of which are complex and time consuming. I also like to browse Pinterest and see things I think I could definitely have a go at quite quickly and easily. This month I have gone for the latter! I have made 2 picture frames for gifts and used washi tape in two different ways, one on the inside of the glass, and one on the frame, but both are super quick and super easy!

The first frame I was making was for my sons nursery teacher as he left last week. I started off with a basic black picture frame (I picked it up from The Range for a few pounds)

 Very simply I wrapped some washi tape over two sides and secured at the back.

To finish it off I used my Silhouette to cut out the words and date in some coordinating colours.
I rarely use mirror board. but for this space themed frame I thought it worked well.
The picture in the frame was only temporary so the teacher could put her class photo in the frame!


The next gift was for a very good friend who was moving jobs, and I wanted to give her one of my favourite photos of the two of us. Again a basic frame, this time with a larger mount inside.

This time I simply removed the mount board and wrapped the washi tape around the top and bottom of the board and secured at the back.
A small embellishment which says Friends Always made from Waltzingmouse Country Labels 4 stamp and cut with a Spellbinders Label 4 die is all that I added to this.


I hope you like the way I transformed two plain frames and made them into something truly gift worthy!

The Washi tape I used was Green with Clear dots and can be bought over at Fantastic Ribbons here.

To see more household projects from other team members just visit the blog.

Monday, 1 July 2013

Pretty Banner Card

Here is the card I made for my beautiful niece who was 1 a few weeks ago. This card is almost entirely made on my silhouette.


First I cut a number 1 from pink card and embossed it with cuttlebug Swiss dots. I also cut a coordinating white number 1 to layer onto. I also cut little banner triangles from white card, and some patterned paper I got in a magazine last year, each one with a letter of her name. 


I placed some pink card behind the letter banners to make them stand out. Each little banner is attached to some twine so it falls like a real banner.


Wednesday, 26 June 2013

Elijah Rainbow Banner

In preparation for the Cake Smash photos I wanted to make some props, and really liked the idea of a name banner. As I had planned a rainbow cake, a rainbow banner was obviously appropriate.
I used my Silhouette to cut the banner shapes, which made it super easy, and I cut each of the letters of his name out too. I then stamped onto each white banner with the coordinating colours, and used square, circle and star stamps.
Here's a close up...

And here's how the finished banner looks :)


Tuesday, 25 June 2013

Rainbow Smash Cake

When my friend who is a photographer was asking for a volunteer to have a go at Cake Smashing I have to admit I didn't have a clue what she meant, but a quick good showed exactly what it was! What do you get if you put a baby and a pretty cake together? Cake Smash!
The deal was, I make the cake, she'd take the photos, so off I set to make a cake. It had to be buttercream icing for the best mess and smash, but I didn't want it to be boring, so I searched around online and found a tutorial for a petal cake. I decided to take it to the next level and do it rainbow coloured. Here are my bags of rainbow coloured icings. You need to work on the one after the other, so I had to be careful to keep them in the right order!

You start by piping dots of each colour, the smudge them right, then add the next row, but move all the colours along one. You repeat this until it is completely covered. 

Here is the cake about to be smashed

Tomorrow I'll be showing the banner I made for the background!

Thanks to the wonderful Kirsty Wiseman for these fab images!


Monday, 24 June 2013

Mickey Mouse 1st Birthday card


This is the card I made for my little man for his birthday, and it is made almost entirely on my Silhouette portrait. We went to Disneyland Paris last week, and in preparation for doing my first real scrapbook I've been looking on Pinterest at loads of Disney layouts and free files which inspired this card. The font is called Waltograph and can be downloaded free from www.dafont.com (SO useful for all your font needs!). I made the background paper myself by replicating a little Mickey head over and over. The Silhouettes print feature makes this easy (and it also meant I could just print his name and then cut it on my silhouette. I googled some Mickey things like hands and shorts, then using the trace feature on the Silhouette software I was able to cut each other the parts in different sections and layer up the colours. Some bright red and yellow card was all I needed to finish it off, with a little stitched edge ribbon. I hope you like it :)

Sunday, 23 June 2013

My little man is 1!

Where has the year gone?! I can't believe EJ turns 1 tomorrow. We had family round today for a little birthday tea and although initially I hadn't planned to make a cake I knew I had to!
Joey suggested Mickey Mouse Clubhouse (we went to Disneyland Paris last week) but I settled on just Mickey Mouse. Not wanting to over complicate it I just made a white base and added red and yellow circles and a Mickey head. My piping is, as usual, not great, but I'm working on it!!! I even tried to do a Disney font!

Hopefully I'll post his Mickey card tomorrow, and some other fun things we did for his birthday!

Sunday, 16 June 2013

Gorjus Girlie card

This is a card I made for my friends daughter who was turning 3. I used a Gorjus Girl stamp and coloured her with promarkers. I've learned my lesson in the past and having coloured a beautiful image not been able to find any paper to match it, so based on some advice from C&C I chose my background paper first and based my promarkers on that! It makes SO much sense! I made use of some little punches which often get neglected, a tiny label one onto which I stamped her name, and a candle one which I think looks cute in the centre of a die cut circle. Doing pinks and purples is outside of my comfort zone, but I'm happy with how it turned out!

Sunday, 2 June 2013

Vintage Wedding Card WMS


I think I have a new favourite stamp set. I have fallen in love with the new Waltzingmouse Folk Medallion set. It is so versatile, and I am excited to see all the different ways I will be able to use it. After the blog waltz I had pinned lots of different images onto my pinterest board, and I totally CASEd this card from Karin here. 

I stamped the main image in versamark and heat embossed with WOW fine white embossing powder, I then chose some of the smaller medallions (of which there are many, and so many combinations you can use!) and stamped them in a variety of browns. I was stamping onto the card which you find in the centre of wrapping paper! I then sponged this and layered up onto some white, brown and then kraft card base.

Friday, 31 May 2013

Cas-ual Fridays 103 Congratulations

cfc103
Here is a card I made for my old uni housemate who took part in this weekends Edinburgh Marathon. Whilst I was trudging out 10km, she was doing more than 4x that distance. Unfortunately her leg gave way and she had to be taken to hospital, but I wanted to send her a card to show what an amazing thing she's been part of.

As I love rainbows I used a variety of different style of wallpaper from some old pattern books in a rainbow colour selection and trimmed them with my wavy blade on my guillotine.
I know I've said this before, but I just love my Silhouette Portrait. I'd ummed and aahhed for ages before deciding to get it, but am so glad I did. I didn't have a stamp sentiment that I thought suited this card, so I just got my silhouette out and made my own custom sentiment! The star is cut from holographic silver card (which I'll admit I normally hate, but here it looked great!).


I hope you like this card which is being entered into this weeked CAS-ual friday challenge, Congratulations.

Thursday, 30 May 2013

OLW142

I was so excited to see that this weeks OLW was to make a card in the style of the lovely Ardyth. Why would I be so pleased? Because her cards are CAS (and I didn't have a lot of time to make this), geometrically pleasing, and mostly RAINBOW!!!!


I wanted to make a card for a friends baby shower, and knew a simple pastel rainbow of little duckies would do the trick. Since most of my baby sentiments are for when the baby has arrived I wasn't sure what to use, so went with "It's a girl" and " It's a boy" and just added some question marks in pen!!!

The colours of promarkers I used where Pale Pink, Soft Peach, Vanilla, Meadow Green, Cool Aqua and Blue Pearl.

I hope you like it!