Showing posts with label new baby. Show all posts

Thursday, 28 November 2013

Baby Boys cards and Gifts 2

We seem to know lots of people having Baby boys recently, and not being one to make identical cards I made variations on a theme for each of them. The main theme was a Silhouette cut name (my preferred font is Segeo Script as it welds really well for cutting), ribbon strip, sentiment and stamped background in matching colours. 
The first card is a stamped gingham background and little punched footprints. I even added tiny star button embellishments to the name for extra depth.

Stamps: Waltzingmouse Offbeat background, Hero Arts Baby sentiment
Ink: Broken China Distress ink
Embossing folder: Swiss dots
Ribbon: Fantastic Ribbons Organza Aqua dots
Card base: White A5

The second card follows many similar ideas. I stamped a background using the concentric circles from the Waltzingmouse Teeny Trees. I did it by eye as I was in a rush, but it is better if you measure out the circle centres properly. If you have a gridded acrylic block its definitely possible to do this by eye like I did.

Stamps: Waltzingmouse Teeny Trees, Hero Arts Baby sentiment
Ink: Broken China Distress ink
Embossing folder: Swiss dots
Ribbon: Fantastic Ribbons Organza Aqua dots
Card base: White A5
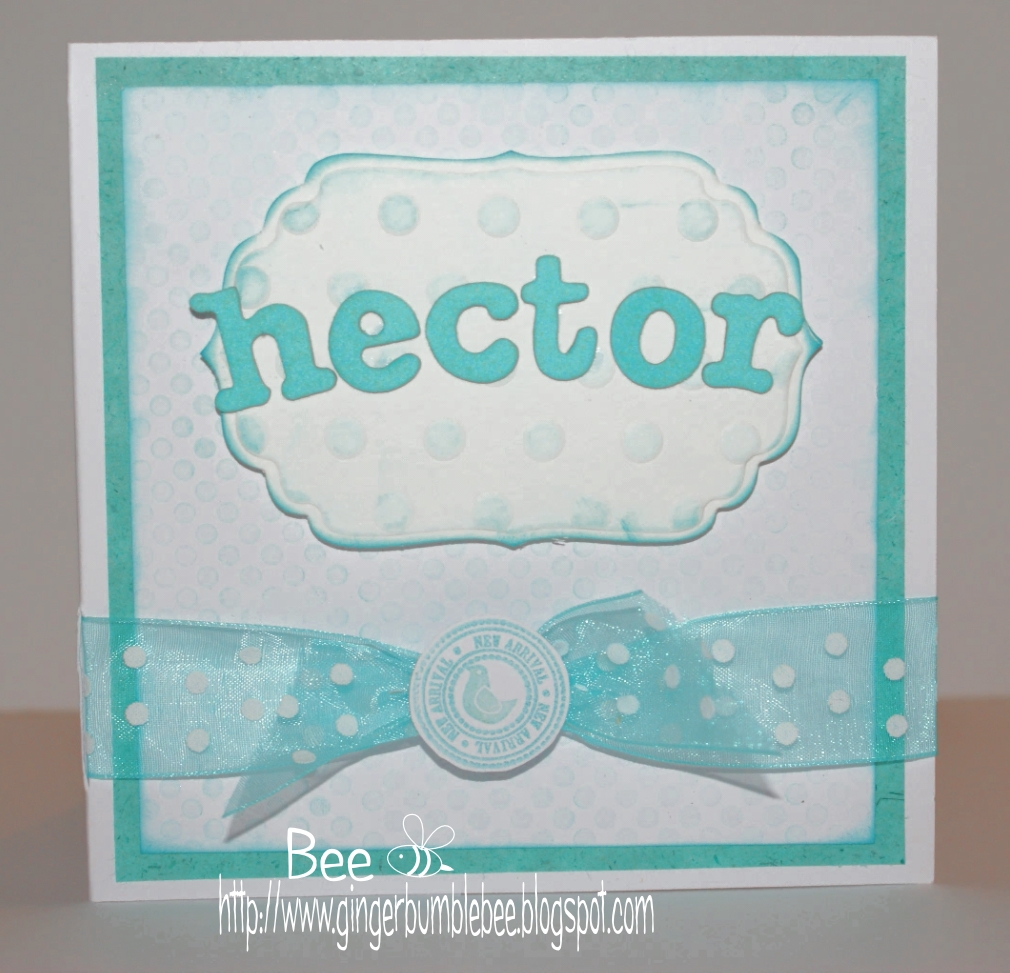
This third card I didn't use a stamped background, but used a That Special Touch of Mica mask and sponged it.

Stamps:  Hero Arts Baby sentiment
Ink: Broken China Distress ink
Embossing folder: Swiss dots
Ribbon: Fantastic Ribbons Organza Aqua dots
Card base: White 5" square


This final piece is a gift I gave to some friends whose little boy was being dedicated. I made each of the cut files and combined to create this image which I framed.

Thursday, 30 May 2013

OLW142

I was so excited to see that this weeks OLW was to make a card in the style of the lovely Ardyth. Why would I be so pleased? Because her cards are CAS (and I didn't have a lot of time to make this), geometrically pleasing, and mostly RAINBOW!!!!


I wanted to make a card for a friends baby shower, and knew a simple pastel rainbow of little duckies would do the trick. Since most of my baby sentiments are for when the baby has arrived I wasn't sure what to use, so went with "It's a girl" and " It's a boy" and just added some question marks in pen!!!

The colours of promarkers I used where Pale Pink, Soft Peach, Vanilla, Meadow Green, Cool Aqua and Blue Pearl.

I hope you like it!

Thursday, 14 February 2013

Fantastic Ribbons Design Team Bows

So this month the challenge for the design team was to do something fantastic with bows! Easy, right?!!
Well I think its fair to say everyone can tie a simple bow (although getting it to sit right on a card isn't always easy), but I decided to do something a little different.

This is a tiered bow.

The great thing about this type of bow is that you can use up all your scrap pieces of ribbon.

I used 3 different types of ribbon, varying lengths and widths, and used some white cotton thread to tie them together, as I was putting an embellishment over them. You could just as easily use another piece of ribbon to tie them together to get a nice neat finish. Think I'll try that on another card!

 Here it is on the card, and I put a length of the main ribbon along the card too.


The card is for our next door neighbours who have just had their first little one, and I cut the name on my Silhouette Portrait. The concentric circle stamps are Waltzingmouse Teeny Trees, and the Special delivery date stamps are from Post Marks PTI, and the Welcome little one is from a Hero Arts Baby set. Ribbon is from, of course, Fantastic Ribbons
Blue organza Polka dot
Teal gingham
White satin

Friday, 18 January 2013

Putting the Silhouette to the Test

So I've been trying out a few things on my new Silhouette Portrait. I'm not 100% sure about the size of the cutting area. I'm a bit confused about how wide it can actually cut as the cutting mat can take an A4 sheet, but the rollers go down part of it and so far when I've used an A4 piece of card the rollers have caused it to stick to the mat and rip partially when I've removed it. They also kind of mark the paper as they squash it! Anyway, to overcome the sticking issue I've taped down the sides of the carrier sheet so the rollers aren't pressing down onto an adhesive bit, but if I don't use an A4 sheet then the rollers would be going on the adhesive, and I'm sure thats not meant to happen.

Anyhow!

My friends had a baby before Christmas, and I knew that I wanted to make a personalised gift for them.
I used my DSA software to create a design which I could cut on the Silhouette. Now designing for papercutting is quite simple in principle, if you want it to be a single piece after cutting then everything has to touch. If you were hand paper cutting (which is something I got a book on for my birthday and am keen to have a go at!) the margins for cutting can be quiet small (as small as you're confident to cut), but on a electronic cutter you have to consider what the blade is capable of and what you can peel from the carrier without ripping.

Bearing these things in mind I designed the image around her name, date of birth and weight, incorporated some stereotypical baby items (all of which I had to do by hand on the software) and then imported to the Silhouette software. I'm really pleased with how it turned out, and hope my friend is too.

My next cutting project is going to be valentines related!


Monday, 1 October 2012

Baby Boy Card

Here is a baby card for some friends for the birth of their little boy Jake.
I started off by cutting and embossing a Labels 1 spellbinders nestability with the Cuttlebug New Baby embossing folder. I did this onto some baby blue card and then sponged with Broken China Distress ink. Next I cut and embossed a Labels 4 nestability in white card and using a grid mask, and again sponged with Broken China ink.  I used some chipboard letters to spell out his name.

The card blank was stamped directly with a plaid/check from the Waltzingmouse Offbeat Backgrounds stamp set (Whispers Starry Starry Night ink). I used some teal blue felt for some of the embellishments, cutting them was really easy with my cuttlebug, much easier than I anticipated, although I wouldn't try an intricate pattern. The first was a scalloped piece (Spellbinders Scalloped edgeabilities) and then I did a small cuttlebug star. To personalise the card a little more I added the little circle sentiment and the date of birth using my Papertrey Ink Postmarks set.


Thursday, 20 September 2012

Baby girl card

Here is a card I made for friends when their little girl was born. Its alot more fussy that my usual style, but I think it works for this card. I started by cutting and embossing a large Labels 1 Spellbinders nestability and its embossed with Divine swirls embossing folder. I then did the same for a medium sized Labels 4 nestability and a polka dot mask. The labels 1 was then sponged with Colourbox Pink ink, and the Labels 4 was sponged with Memento Angel Pink. I added some Stampendous spots down the sides of the cards, used a flourish in the background in a subtle pink (My Minds Eye -Wild Asparagus) and also stamped a Tonic Buttefly punch with some script from the same set. I spelled out the name of the baby using chipboard letters  and then added the fantastic pink polka dot ribbon.


Monday, 7 May 2012

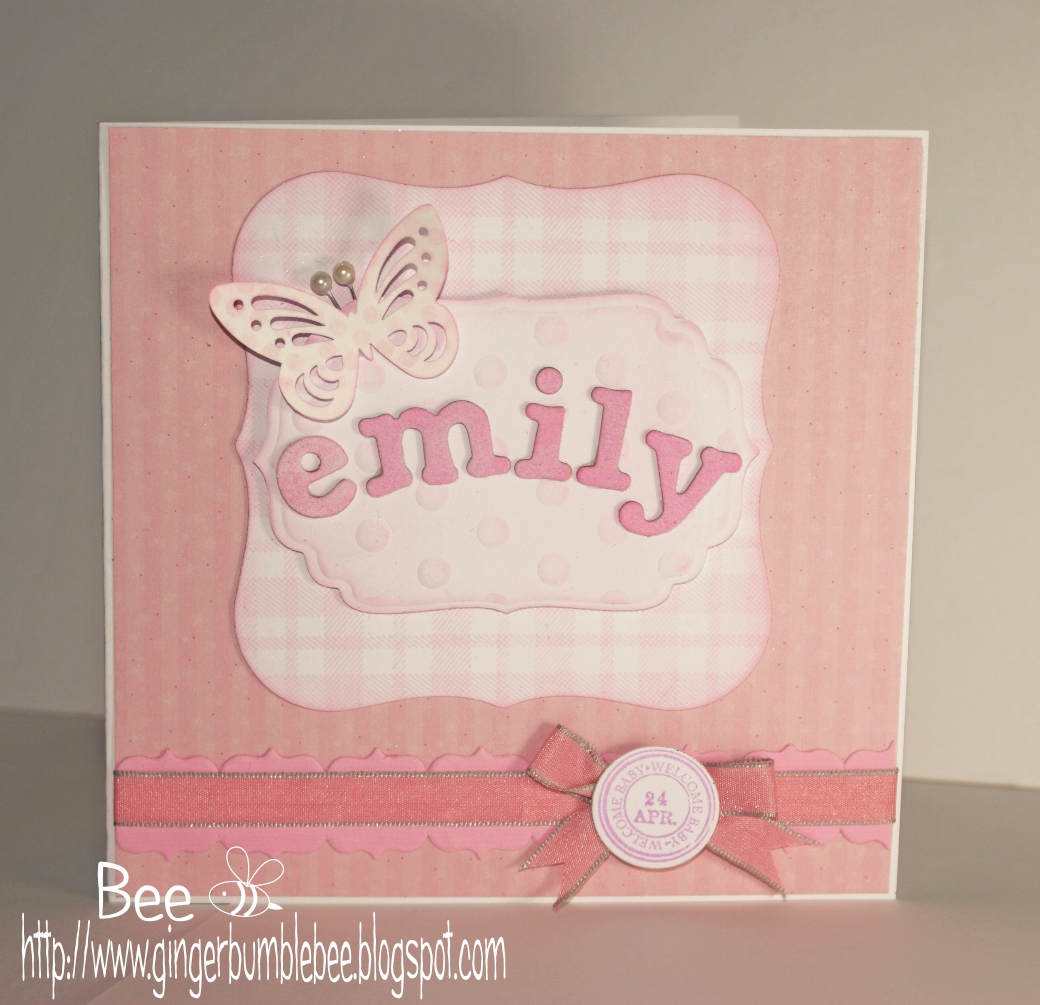
Welcome Emily

So last week my little Niece Emily was born, she is my 2nd niece and she is just gorgeous!
Here's the card I made for her.
Stamps: Plaid background stamp on the labels 1 shape is Waltzingmouse Offbeat backgrounds
The butterfly is stamped with polka dots from Waltzingmouse Offbeat backgrounds too. 
The Welcome baby and date stamps are from Papertrey Ink Postmarks set.
Ink: Main images are inked with Memento Dew Drop Angel Pink
Small date circle was too pale in angel pink so I used Colourbox Lilac ink.
Die cuts/Punches: Butterfly is Tonic Studios
Stacked nesties are Spellbinders Label 1 and label 4 - label 4 is embossed with polka dots.
Under the ribbon is a strip from some Bazzill basics die cut strips. 
Little circle is the spellbinders nestie smallest circle size.
The chipboard letters I've had for ages.
Cardstock: Background striped paper is from papermania, don't know which pack, sorry!
Ribbon: VV Rouloux


I also stitched her a personalised blanket. The rabbit is just cut from white fleece material and I embroidered the main features. I then cut out the letters from white fleece (using some chipboard letters as a template!) and then when I'd stitched them on in white I added some outline stitching to make it stand out a little. The blanket itself was from Sainsbury's (a supermarket) and has cute little hearts almost embossed on it.

Tuesday, 17 April 2012

Waltzingmouse blog party - New Beginnings

Next Blog Party on the 17th


Today is the monthly Waltzingmouse blog party, and the theme is New Beginnings, I have chosen to make a baby shower card for my sister in law who is due in just a couple of weeks (so exciting!).
Baby showers are not that common in the UK, but we just have a little get together and give gifts.
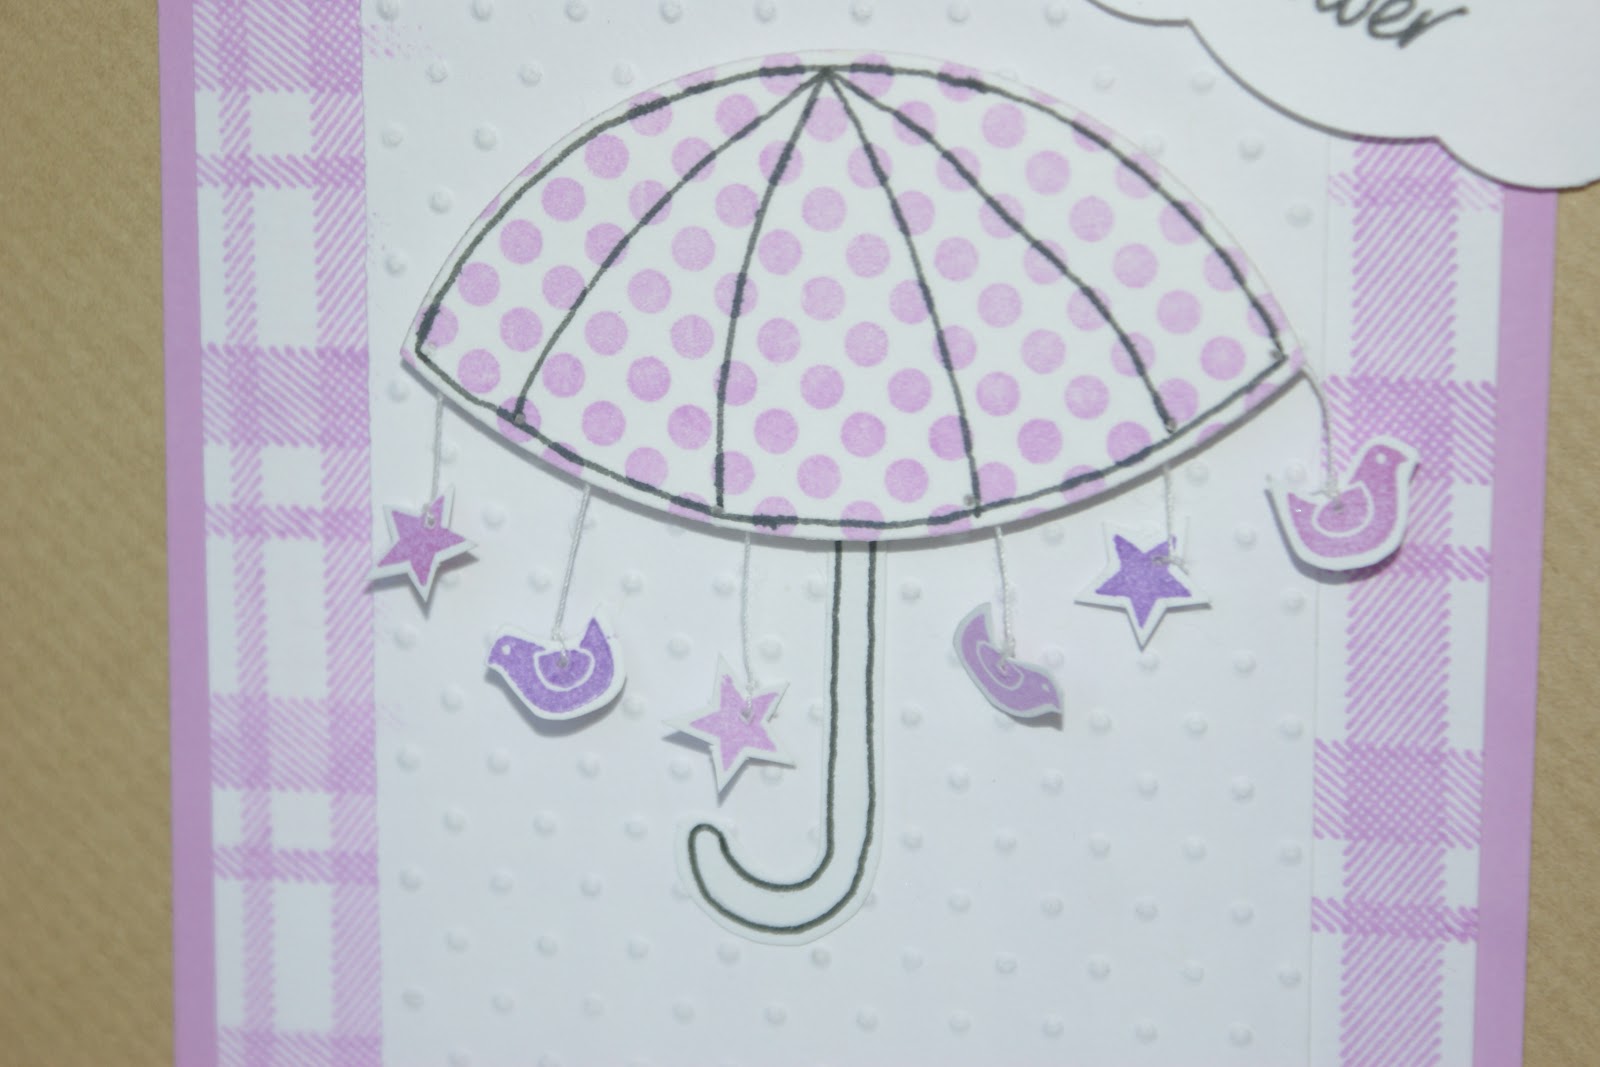
My card was meant to represent a rain shower, and the main image is a mixture of an umbrella and a baby mobile.
I started off by stamping Offbeat background polka dots in lilac ink, then made a background piece using the Offbeat Background tartan/plaid in lilac. I don't have an umbrella stamp, so once I'd done my polka dots I used 2 different sizes of circle nestabilities to cut the umbrella shape and used a fine line marker to draw out the umbrella and then its handle. 
The next step was the little birds and stars which are hanging from the umbrella, these are stamped in various shades of pinks/purples and are images from the Teeny trees set. Because I was worried about them turning around I actually stamped on both sides, which is pretty handy that you have the birds facing both ways! I threaded them onto some white thread and stuck them to the back of the umbrella.
Hopefully you can see in this image that the umbrella is sat on an embossed matt (CB swiss dots) which is meant to represent the rain, and the little cloud is punched and I hand wrote the sentiment.
Finally I layered it all up, added some dimension to the umbrella with some foam pads and then did a faux stitch around the outside of the kraft card base.

I hope you like my card, and if you want to look at the other cards for the Waltz head over to the waltzingmouse blog.

Wednesday, 14 March 2012

Waltzingmouse Sketch Challenge 88 - Baby Card

WMS Sketches_MS font_separate 
Here is my take on this weeks Waltzingmouse Sketch Challenge.
I was so pleased to hear that some of our University friends had their little twins this week, and so this was the perfect opportunity to make a card. I printed off their names on the computer and made into tiny banners. I stamped Waltzingmouse polka dots (Offbeat Backgrounds) in Memento Angel pink onto some white card. I then cut some circles from white card using my nesties, and at the same time embossed them with some circles. The background of the circles is a Mariannes Die. I didn't have any pink card to use for my layers and die cuts so I improvised and coloured some white card with my promarkers which worked really well. The butterflies are stamped and punches with a Martha Stewart punch.
The small 'Special Delivery' stamp with the date of birth is from Papertrey Ink, and I made a little flower for it to sit on. Some double ribbon finished it off.
I hope you like my take on the sketch!

Thursday, 2 February 2012

Baby girl special delivery card

It seems there is a never ending succession of births at our church, since I became pregnant with Monkey in November 2008 there has always been someone pregnant, and we're now up to 12 babies/toddlers, with 3 more babies on the way! So here is another baby card I have made recently, and made good use of my new Papertrey Ink Postmarks set to do the small circular sentiment which is on the ribbon. I love that you can include the date! The background is stamped using my Waltzingmouse Offbeat background polka dots, and the main image is a Spellbinders labels 4 which has been cut, then embossed with a polka dot mika mask and then sponged. The chipboard letters were from Quality Save ages ago, and I've no idea what make they are. This is much pinker than my other baby cards, but I had run out of A's in my pale pink chipboard letters!
Hope you like!
Bee x

Wednesday, 23 November 2011

Waltzingmouse Sketch Challenge 74 - Baby Card

There's still time to enter my blog candy for some gorgeous ribbon just by commenting over here.
#74 Sketch

Welcome to this weeks Waltzingmouse Sketch challenge. Here is a new baby card for our friends, and I'm just dotty about it! 

The main image is a labels 4 nestability which has been embossed with a mica mask to give the polka dot effect. The background is stamped in a polka dot pattern from Waltzingmouse Offbeat Backgrounds. The tiny little element at the front is a StudioG 'new arrival' stamp with a waltzingmouse teeny trees bird in the centre.

To visit the sketch challenge blog just click here.

Saturday, 12 November 2011

Baby card - Waltzingmouse sketch challenge #73

Image(21)


For todays Waltzingmouse sketch challenge #73 I have made a baby card for a couple at church who have just had their 2nd little one.
I used some pink chipboard letters for her name (although I didn't have an 'e' so had to make a 'c' into one!) and made a little banner for them to sit on. I used my Labels 4 nestabilities and my cuttlebug embossing folder to make the central piece. I used a technique where you first cut the shape from the card, then place a mask, or in this case I just used half of a cuttlebug embossing folder (by opening it out fully) on the non cutting side of the die, and then a No More Shims embossing mat on the other side and run it through your cuttlebug again. This has the effect of embossing the label, but leaving a nice clear edge. I inked this up with some pink ink to make the embossing stand out. I'll try to do a tutorial on this sometime soon, as its a technique I use alot, and having bought loads of new masks at NEC I'm sure I'll be doing more!!

I used my Waltzingmouse Offbeat backgrounds to stamp the stitching around the edges, the background paper being some Papermania mistletoe kisses. Its a very subtle pink stripe. I also took a tiny label and stamped onto it a 'new arrival' stamp from studio G. I then stamped an adorable little bird from Waltzingmouse teeny trees set in the centre. Some ribbon and a button finished it off nicely
.Remember to head over here and enter my blog candy if you haven't already

Monday, 17 October 2011

Speedy the Cats Friend Challenge 77 - Seeing Double

Welcome to this weeks Speedy the Cat Friend challenge - seeing double! How appropriate that I was needing to make a card for some friends who have just found out they are expecting twins (they're going to be seeing double for years to come!!!)
The backing paper is from Matt Stack, the central piece is a nestability label 1 which was embossed with the die still in using my polka dot 'That Special Touch of...' mica mask. I then sponged with both forest moss distress ink and some Brilliance lime pearlescent ink. The ribbon is from a set of ribbon I bought by VV Rouleaux. I stamped my new Anna Griffin Monogram circle stamp onto some dark green card and embossed with white superfine powder. The central image was then stamped with a Papermania sentiment from the Sunflower sets. I also punched some little feet  into the other two circles. I hope you like it!


Thursday, 5 May 2011

Quick baby card

So today I have a very quick card. One of our church friends had a beautiful baby girl a couple of weeks ago, and so I was making a little card. I have made SO many baby cards, and no two are ever alike, and this one if definately unique because it doesn't feature any stars!!
I started by embossing some white card with CB Baby embossing folder. I also embossed a labels 4 die cut with a Special Touch mask. I saw a great tutorial over at ikkis cuttlebug cupboard to do this, you can see it here.
I used some pink ink to highlight the embossing, and then added some chipboard letters to spell the baby name. Some pink ribbon, and layered onto pink card and then onto an A5 white card and you're done! Quick and effective. I'm excited to see what other nesties I can emboss with my Special touch masks! I'm already thinking circle nesties and circles mask!Hope you're inspired to!

Wednesday, 5 January 2011

Star Cards

Here are a couple of cards I've made in the last few months with a star theme (I love stars!). The top one is one I made for my niece's 2nd birthday. It is a 6" square easel card with a star front. I used the embossing board on my Ultimate Pro to do the star shapes and the papers are actually from a small Christmas stack which I got free on the front of a craft magazine. The word "two" is made from some cardboard stickons I got in a craft bundle, which I covered in ink and then embossed silver. The larger star is pearlised card in a white/silver which I have inked around the edges with pink.
 This second card was to celebrate the birth of my friends little girl. This is an A5 card on white cardstock. I've used the Ultimate Pro embossing mats again for the star shapes, and also the banner shape. The two vertical stripes and the background paper of the star are girly sentiments from a mat stack I've had for ages. I used the cardboard letters again for the name, and finished off by using straight silver peel offs down the sides and around the star (very fiddly!) and then attaching some standard silver stars around the back.