Showing posts with label waltzingmouse. Show all posts

Saturday, 25 January 2014

Kraft Flower cards

Here are a couple of cards I made recently for friends who were starting new roles at work. I wanted to make something simple yet classic. I love these Waltzingmouse stamps, but couldn't find a matching stamp that said new job, so printed out the sentiment onto some white card and then stamped onto that. Some basic sponging (Distress ink tea dye) around the edge, a thin ribbon and layered onto some kraft card finished this off.

This hyacinth is one of my favourites!

Thursday, 28 November 2013

Baby Boys cards and Gifts 2

We seem to know lots of people having Baby boys recently, and not being one to make identical cards I made variations on a theme for each of them. The main theme was a Silhouette cut name (my preferred font is Segeo Script as it welds really well for cutting), ribbon strip, sentiment and stamped background in matching colours. 
The first card is a stamped gingham background and little punched footprints. I even added tiny star button embellishments to the name for extra depth.

Stamps: Waltzingmouse Offbeat background, Hero Arts Baby sentiment
Ink: Broken China Distress ink
Embossing folder: Swiss dots
Ribbon: Fantastic Ribbons Organza Aqua dots
Card base: White A5

The second card follows many similar ideas. I stamped a background using the concentric circles from the Waltzingmouse Teeny Trees. I did it by eye as I was in a rush, but it is better if you measure out the circle centres properly. If you have a gridded acrylic block its definitely possible to do this by eye like I did.

Stamps: Waltzingmouse Teeny Trees, Hero Arts Baby sentiment
Ink: Broken China Distress ink
Embossing folder: Swiss dots
Ribbon: Fantastic Ribbons Organza Aqua dots
Card base: White A5
This third card I didn't use a stamped background, but used a That Special Touch of Mica mask and sponged it.

Stamps:  Hero Arts Baby sentiment
Ink: Broken China Distress ink
Embossing folder: Swiss dots
Ribbon: Fantastic Ribbons Organza Aqua dots
Card base: White 5" square


This final piece is a gift I gave to some friends whose little boy was being dedicated. I made each of the cut files and combined to create this image which I framed.

Wednesday, 20 November 2013

Fall Leaves Wedding Card


Here is the wedding card I made for one of my best friends who recently got married. She wanted a vintage Autumn theme wedding, complete with Fall Leaf cake and all the vintage extras. I decided to make a card which tied in with both these things. I think the little love birds in the tree work well for a wedding card, but this card could easily be adapted to have 1 or no birds in the tree, and with an alternative sentiment.


I even used some of my precious Nana's buttons from her button tin, but they definitely set the card off.

Stamps: Waltzingmouse Teeny trees, Papertrey Ink Leaf prints
Ink: Tim Holtz Distress inks- Tea Dye, Antique linen, Spiced marmalade, Barn Door, Walnut stain
Twine: Fantastic Ribbons Gold and Ivory Bakers twine
Card base: Kraft 6" square

Please let me know what you feel about my alternative style wedding card!

Tuesday, 19 November 2013

CAS summer Thank You card


A simple yet classy card to say thank you. A little bit of embossing goes a long way, especially on white card, and swiss dots is one of my favourite embossing folders.
As you may realise, green is my go to colour, and this great polka dot washi tape from Fantastic Ribbons really works well.

Stamps: Waltzingmouse Country Labels 4
Ink: Memento Black, Bundled Sage Distress ink
Dies: Spellbinders Labels 4
Embossing folder: Swiss dots
Washi tape: Fantastic Ribbons Green Polka
Card base: Cream A5

This is being entered into the Lawnscaping Challenge #70 - Polka dots

Saturday, 5 October 2013

Give Thanks to the Lord Cherries Card


This was a card I sent to Lebanon with a care package of the new Cadburys marvelous creations chocolate for a good friend of mine who is out there helping engineer some projects.

We met when we were both 18 and taking a gap year before university and doing a Year in Industry at different engineering companies, but right next door to each other. Why did we hit it off? Because we both had WWJD bracelets on and had an instant connection.

I was excited to break out my Country Labels 4 stamps again, and especially these super cute cherries.
I stamped the background cherries using Memento Lady Bug ink and pearlised green ink. I used the same green to stamp the labels 4 shape and also on a scrap of card I stamped an extra cherry to fussy cut to embellish. I cut the labels 4 with my Nestabilities die, and a larger one to layer onto which I embossed with Cuttlebug swiss dots. Some lovely dotty ribbon and  layered onto black card and it was finished!

Wednesday, 4 September 2013

Peter Rabbit First Day of School


This week was my son and nieces first day of Primary school. The card I made for the Waltzingmouse Pajama party here I gave to my son. For my niece I cracked open a new stamp set from Crafters Companion and printed this Peter Rabbit, and coloured with Promarkers. I used my Country Labels 4 stamp for the mat, and also the tiny apple stamp from Teeny trees for my background (I thought it tied in well with the school theme). I cute the mats with Spellbinders Labels 4 and embossed with some circles. Some tiny buttons to embellish it finish it off.

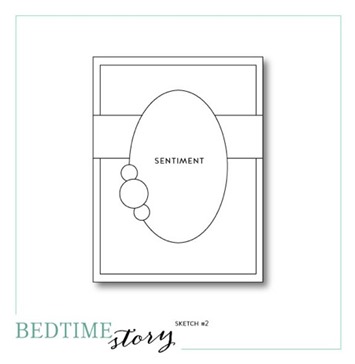
This card is being entered into the Waltzingmouse Bedtime Story Sketch
PAJAMA-PARTY-sketch-2

I hope you like, and please go look at the other entries into the sketch challenge.

Friday, 30 August 2013

Waltzingmouse Pajama Party

PAJAMA-PARTY-LOGO


I'm excited to be taking part in this months pajama party, especially because I wasn't sure I'd be able to play along, partly due to time constraints, but also because at first glance I couldn't come up with anything for the 4 categories. In actual fact I started to come up with an idea, and it led me to try and incorporate all 4 challenge themes in one card!

The themes are:
1. Tie a knot in it
2. Get Nauty(cal)
3.  Colour inspiration
4. Golden Oldie stamp sets.

So here's my card

So here's how I did it.
I stamped the cloud shape in versamark, from my oldest WMS set,(the awesone Teeny trees!) I think its a tree outline, but it makes a great cloud!  I heat embossed with white embossing powder to act as a resist to the blue ink I sponged for the sky. 

I used my Silhouette to cut the pirate ship(I bought the file from the silhouette store), and then stamped some detail onto the ship using an Offbeat Background stamp to look like planks. I also sponged the sails and added the pirate detail to the flag. 
I cut some blue paper with Spellbinders edgeabilities scalloped borders and then stamped onto it with another Teeny trees stamp to give a wave effect.

I added some extra details with a burgundy crows nest, some Card Candy gold port holes and a hand made anchor.


Here's how I met the challenge themes:
1. Tie a knot in it - My anchor is hand made from silver wire and twisted and knotted. It took me a couple of attempts to get it to look like this!
2. Get Nauty(cal) - The pirate theme!
3.  Colour inspiration
4. Golden Oldie stamp sets. - My oldest WMS stamp set is Teeny Trees.

I hope you have enjoyed seeing what I created, I love to hear your feedback. If you'd like to see what everyone else made pop over to the Waltzingmouse blog.

Thursday, 1 August 2013

Happy Everything Goes!


Here is a card I made for my sister in law whose birthday is tomorrow. After being inspired by the recent Pajama party to use my Folk art medallion set with some vivid colours I set about finding the perfect combination of colours. After some experimentation I decided to go for Distress Inks in Seedless Preserve, Forest Moss and Chipped Sapphire.


I took the tiny pennant from the set and stamped along the central section with alternating colours.
I also embossed some purple card with Swiss dots and stamped an extra medallion and some leaves for embellshmenst. Finally the sentiment is Paper Smooches from the set Simply Said.


I'm entering this into the Waltzingmouse Pajama Party Bedtime story sketch


and the Paper Smooches Anything goes challenge


Monday, 29 July 2013

Pajama Party! - Kraft art folk Happy Days card

Welcome to the First Waltzingmouse Pyjama Party! 
It's a late night (UK!) blog party which replaces the Blog party/Blog waltz. I'll be honest, I'll miss the old format on the 17th, but I do welcome the broader range of the new challenge, as some months I was really struggling to find a way to play along, sometimes meaning I just wasn't able to, but the new format means that will be much less likely.
Personally I'm not a night owl, so will probably be one of the last to link up my cards, but hey ho!

I chose to do the In The Background challenge, and stamp one of the small Fold Art Medallion images.


Here is the card I made for a friend who is starting a new phase in her career and I wanted to let her know that bright days are ahead. I think Folk Art Medallions is one of my new favourite stamp sets from Waltzingmouse, and it's SO versatile. I stamped up the background super quick using Walnut Stain distress ink and it was straight forward using a grid acrylic block. I actually stamped straight onto the kraft card base. I then stamped the Folk Art Labels 25 onto some cream cardstock using more walnut stain and the sponged all the edges. The sentiment is from an old set of Banana Frog stamps, but they are now discontinued. A lovely chocolate brown ribbon edged in gold finished off this card.
I hope you like it, do check out the other cards over on the Waltzingmouse blog.

Sunday, 21 July 2013

Fantastic Ribbon Design Team Wonderful Washi objects!


This month the Fantastic Ribbon Design Team have been using Washi tape around the home. 
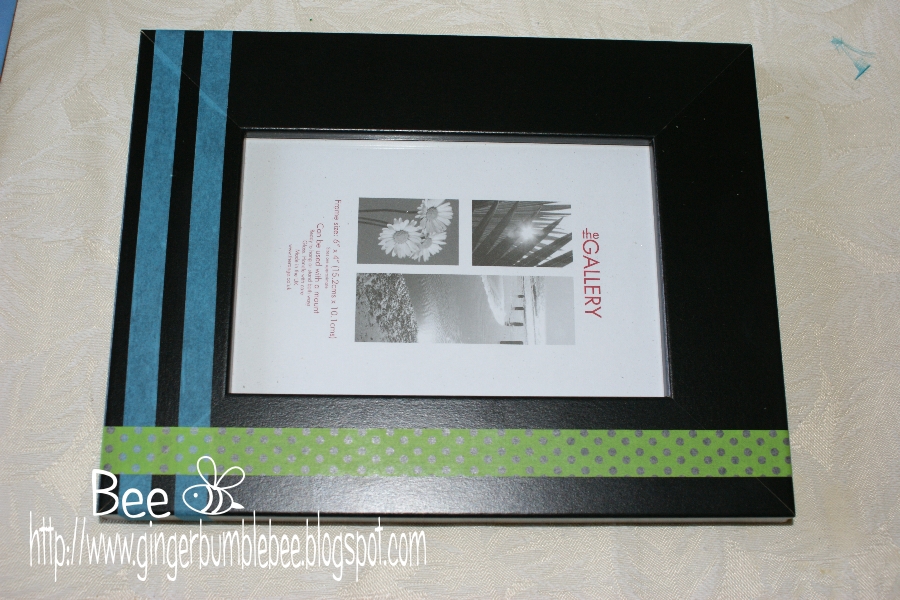
I know for me I love to see inspirational and aspirational projects, some of which are complex and time consuming. I also like to browse Pinterest and see things I think I could definitely have a go at quite quickly and easily. This month I have gone for the latter! I have made 2 picture frames for gifts and used washi tape in two different ways, one on the inside of the glass, and one on the frame, but both are super quick and super easy!

The first frame I was making was for my sons nursery teacher as he left last week. I started off with a basic black picture frame (I picked it up from The Range for a few pounds)

 Very simply I wrapped some washi tape over two sides and secured at the back.

To finish it off I used my Silhouette to cut out the words and date in some coordinating colours.
I rarely use mirror board. but for this space themed frame I thought it worked well.
The picture in the frame was only temporary so the teacher could put her class photo in the frame!


The next gift was for a very good friend who was moving jobs, and I wanted to give her one of my favourite photos of the two of us. Again a basic frame, this time with a larger mount inside.

This time I simply removed the mount board and wrapped the washi tape around the top and bottom of the board and secured at the back.
A small embellishment which says Friends Always made from Waltzingmouse Country Labels 4 stamp and cut with a Spellbinders Label 4 die is all that I added to this.


I hope you like the way I transformed two plain frames and made them into something truly gift worthy!

The Washi tape I used was Green with Clear dots and can be bought over at Fantastic Ribbons here.

To see more household projects from other team members just visit the blog.

Sunday, 2 June 2013

Vintage Wedding Card WMS


I think I have a new favourite stamp set. I have fallen in love with the new Waltzingmouse Folk Medallion set. It is so versatile, and I am excited to see all the different ways I will be able to use it. After the blog waltz I had pinned lots of different images onto my pinterest board, and I totally CASEd this card from Karin here

I stamped the main image in versamark and heat embossed with WOW fine white embossing powder, I then chose some of the smaller medallions (of which there are many, and so many combinations you can use!) and stamped them in a variety of browns. I was stamping onto the card which you find in the centre of wrapping paper! I then sponged this and layered up onto some white, brown and then kraft card base.

Thursday, 16 May 2013

Fantastic Ribbon Spring Flower Card Including tutorial

This month the Fantastic Ribbons design team are making ribbon flowers for your inspiration!

So here is my card, showcasing some beautiful polka dot satin 10mm ribbon and some green polka dot washi tape.
After I made this card a few months ago people were keen to see a tutorial on how to make the ribbon flower, so here's what you'll need:
A circle cut from card and covered in double sided tape and some ribbon.
Now for the finer details!
I used a 1.5inch circle punch, 1m of 10mm ribbon (there was enough left over for my card, but its good to have a bit extra). The double sided tape should be as strong as possible, I recommend the red backed tape. The ribbon can be pretty much anything, but organza doesn't work very well.


So you start by attaching the ribbon 1/2 on, 1/2 off the circle and lay down about 1cm, then fold back a small overlap. Continue around the outside adding 1cm folds until you completely cover it, and then when you get back to the start you can move in a layer. Continue doing this until it is completely covered.


I did a pink one too.

You could use a button as a centre (Left), or a large brad (Right)


I stamped some leaves (Waltzingmouse Folk Medallions), a stalk and sentiment (Stampendous Ribbon builder) and added some washi tape and ribbon to a 5" white card which I'd sponged with green ink round the edge and added it to a 5 1/2 " card base.

I hope you like my spring flower, and do have a go at making your own ribbon flowers, they make a great embellishment, and are really easy to make.

Please check out all the beautiful ribbons over at Fantastic Ribbons for your inspiration!


Sunday, 12 May 2013

Art Deco Eiffel Tower Card

Here is the card I made for my mother in law. It is perfect for her, because she loves the art deco style ladies and we're going to Paris together in a month! I used some of my lovely Waltzingmouse Paris Nouveau stamps: the lovely art deco border stamped in Peacock Feather Distress ink, the Eiffel tower stamped in Archival Black, and the Paris word. The art deco lady and the Best Wishes sentiment are from a free set by Claire Coxon that came with a Docrafts magazine this winter. I stamped the art deco lady onto some Stix2 masking paper and cut her out so I could stamp the Eiffel tower behind her.

I stamped some more Peacock feather distress ink onto my craft mat and then painted with it like a water colour. I also mixed some Antique linen with some Barn door distress ink to make her skin tone. Peacock feathers tie in with her hair piece and dress really well. I sponged around the outside with more distress ink.
Finally I added some Fantastic Ribbons Aqua Organza. A little white tag and some nice pins, and a little turquoise gem on her headpiece finished it off.

Tuesday, 23 April 2013

Waltzingmouse Flower show CASE


Today we are CASing cards from the recent Waltzingmouse Flower Show.

 I knew when I was looking through the cards that I wanted to CASE JJ Bolton, and had trouble choosing between the two cards she had made, but eventually I settled on the vellum one.

  here is JJs original here


I started off by stamping the main image from Folk Medallions in a rainbow of colours (I do love rainbows!). I then cut a circle in the centre, using circle nestabilities, which would make the centre of the card visible.
I stamped a red medallion onto a piece of white card which would sit inside the card underneath the main medallion and be seen when the card was closed.

Here's how it is when it's open. You can see some of the glitter in the vellum too.
I used my silhouette to cut the black cardstock to the shape of the medallion.


Here's how it looks when its closed.


I added some Fantastic Ribbon rainbow ribbon and a Paper Smooch sentiment (Simply Said) which was stamped in versamark and used Wow extra fine white embossing powder.

Here you can see the inside of the card with the small medallion.

I hope you like my take on the original :)