Showing posts with label wedding. Show all posts

Tuesday, 17 December 2013

Fall Leaf Wedding Cake

When one of my best friends asked me if I'd be able to help her with her wedding, I automatically thought she wanted me to make her wedding stationary. However, she had something else in mind - Cakes!
Having never made anything more than a birthday cake I was a little apprehensive, but am always up for a challenge. Part of the challenge also lay in making 2 wedding cakes (a brides and a grooms cake) and 120 cupcakes...oh and they only had to be taken 200 miles to the wedding!

Here is the wedding cake she requested.

I cut all the leaves using some cutters I found at Windsors Cake Craft in Warrington, and I then used my wonderful PTI Leaf stamps to imprint them. (I placed cling film on the stamp to make it food safe!)
I then painted them with food colouring to be the fall colours

Here they are drying on my dining table!

And here is the complete display of all the cakes and cupcakes I made for the wedding, including the Lego wedding cake you can see further down here on my blog.


Finally, here is the happy couple cutting the cake!

Wednesday, 20 November 2013

Fall Leaves Wedding Card


Here is the wedding card I made for one of my best friends who recently got married. She wanted a vintage Autumn theme wedding, complete with Fall Leaf cake and all the vintage extras. I decided to make a card which tied in with both these things. I think the little love birds in the tree work well for a wedding card, but this card could easily be adapted to have 1 or no birds in the tree, and with an alternative sentiment.


I even used some of my precious Nana's buttons from her button tin, but they definitely set the card off.

Stamps: Waltzingmouse Teeny trees, Papertrey Ink Leaf prints
Ink: Tim Holtz Distress inks- Tea Dye, Antique linen, Spiced marmalade, Barn Door, Walnut stain
Twine: Fantastic Ribbons Gold and Ivory Bakers twine
Card base: Kraft 6" square

Please let me know what you feel about my alternative style wedding card!

Sunday, 17 November 2013

Lego Brick Wedding Cake

When one of my best friends asked me if I'd be able to help her with her wedding, I automatically thought she wanted me to make her wedding stationary. However, she had something else in mind - Cakes!
Having never made anything more than a birthday cake I was a little apprehensive, but am always up for a challenge. Part of the challenge also lay in making 2 wedding cakes (a brides and a grooms cake) and 120 cupcakes...oh and they only had to be taken 200 miles to the wedding!

Here is the Grooms cake, as per request I made a Lego Brick cake (It was vanilla sponge with buttercream and raspberry jam) and made fondant lego wedding figures of the bride and groom.

I piped the lego logo onto each brick top as each lego piece has.


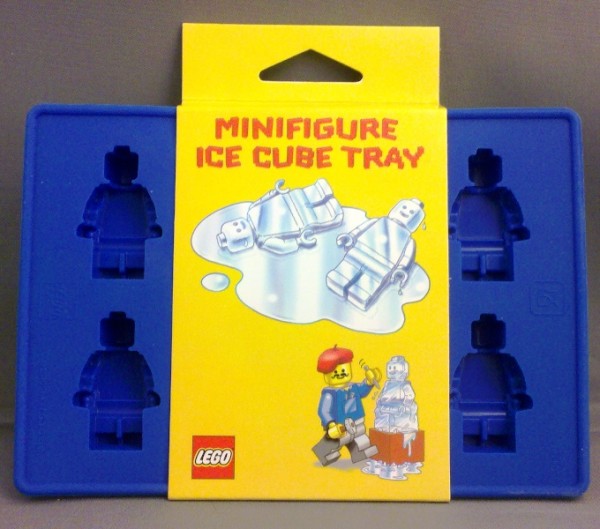
To make the fondant figures I started with a lego ice cube tray and placed yellow fondant in the head and hand locations, and then either black or white fondant where the clothes would be. I put them in the freezer to make them easier to remove from the mold, as the fondant alone wouldn't have come out cleanly other wise. I made 8 different figure (4 of each) to have more choice of which ones turned out best. Once they had dried for a few days out on the side I added the features using a food colouring pen and the hair, tie and lapels and wedding dress using extra fondant. 
The cylinders on the top of the cake ended up being Oreos covered in icing, as my sponge circles cut from an extra cake I made crumbled into a thousand pieces when I tried to butter cream them!

I added Trex to my fondant to make it look nice and shiny like a plastic lego brick, I think you can see the shine on the picture above.

I hope you like my Lego wedding cake!

Wednesday, 18 September 2013

New York Silhouette Skyscape Wedding gift

Here's a paper cut I designed for a very good friend of my DH.

The New York theme is because he proposed there.


I bought the main background file from Silhouette Store, and then made some alterations to it on the silhouette software to adapt the buildings and the windows. I added in a heart shape to the windows on one building.

The bride has a couple of cats, so I sneaked one under the Brooklyn bridge, which I designed the cut for using a photo from google.

Here are wedding rings and love birds, and this shows the dimension I got between the black and grey.

And finally the good old Statue of Liberty! I bought this from the silhouette store too.

I hope you like this, I was please with how it all worked together.

Thursday, 15 August 2013

CAS Anniversary card


This is my CAS anniversary card for my husband for our 9th Anniversary (9 hearts!). I'm lucky that my lovely husband loves the CAS style, so I don't have to spend hours slaving over a card for him! In fact this one was super quick once I'd decided what I wanted to do. I was inspired by this image which I have on one of my pinterest boards, and knew if I made it with 9 hearts and 'love' it would be perfect. It was so easy to do on my Silhouette Portrait. I raised the top layer off the red card to give it some depth.


My husband loved it, hope you do too :)


Monday, 15 April 2013

Wedding A4 Papercut

Have you ever made something and you just can't seem to get it right (a card, scrapbook page, item of clothing, cake)? Well this project had that kind of feeling. Everytime I thought I was just finishing it...something happened.

It all started when I decided that instead of just making a personalised card for a couple of friends getting married I would go the whole hog and make their present too. About a week before the wedding my plans were hampered by my silhouette portrait conking out (a problem with the power cable, Graphtec did a great job of sorting me out a new one, and some Online Silhouette vouchers for my troubles!) and so I wasn't able to get it done in time for the wedding, but undeterred I continued!
So I created the design and cut it...but I wasn't sure if I wanted it white or kraft...so I cut both. White with a kraft paper behind was my decision, so next I decided to distress it...until my husband came over and said "you've got fingerprints on it" and I said "thats the inking"...."oh". Unsurprisingly I thought I'd better start again...but I'd run out of kraft card, so after cutting it (again) I had to stick my (un-inked!)cut onto some kraft wrapping paper which I'd attached to some plain card to give it a bit of body.
Unfortunately the following day I noticed the whole thing had crinkled because the kraft paper wasn't substantial enough. cry.
So I set about cutting it a 4th time (thank goodness I didn't hand cut it!), and still not having any kraft card I improvised again with a cardboard box. Then I couldn't decided whether to attach it directly to the card, or raise it up on foam pads for dimension.
Top Row:
Left: Design cut from kraft paper. Middle: The remnants on the carrier sheet waiting to be removed. Right: 3rd attempt on kraft paper which crinkled.
Bottom:
Left: The distressed 1st attempt. Right: FINAL 4th attempt!

I actually HATE being a perfectionist sometimes, I really need to be able to accept things that aren't perfect...but this wasn't just a nice card, this was a framed gift, and perfection was what I was aiming for.

FINALLY, I had a cut I was happy with, mounted in a way which showed off the cut.


And I'm sooooo pleased I can just give it to the happy couple and not think about it anymore. Plus I don't have to clear all the waste of my carrier sheet for a 5th time!!
Have you ever had a never ending project?!!