Saturday, 18 June 2011

Fathers Day card 2

Ok, so here's my second fathers day card, which is for my dad. This is a really simple card to make, and it was an idea I had as soon as I picked up the cute luggage labels from The Works (incredibly 80 for 99p!).
I used a wonderful stamp alphabet from Bananafrog called Budmo Jiggler! I used cracked sapphire distress ink onto the labels to spell dad, (They took ages to dry and I still smudged one.grrrrr!) and then used some forest moss distress ink to gently sponge the edges.
I used some complimentary papers (can't remember where from) and some ribbon to tie the whole thing together, and there you have it!

Fathers day card

Here is my fathers day card (not for my dad, but for my husband from our little one!). I love this card, mostly because its so personal, and so unique!

I am in the enviable position of having a friend who is a fantastic drawer (artist actually!) and she came over for a play with some promarkers, and I asked could she draw me a bath with a duck in it. Sure enough she just drew this...
I was so pleased, and it was perfect for what I wanted.
However, when my friend went home I realised what would have been better would have been two ducks in the bath, a little one, and a big one. I'm sure she doesn't mind that I went ahead and used my lightbox (holding up the paper to the window!!!) and traced the bath again, and added an extra little ducky!
I then used my wonderful promarkers to colour in the image.
I had already decided to use some little cardboards letters to spell out daddy, and to finish it off I added a little sentiment. My little one has recently decided he doesn't like the bath, or more specifically sitting in the bath - he'll stand and play in there no problem!- but if daddy gets in with him he'll sit, splash, and have a whale of a time, hence the bath themed card!
So the sentiment I went for was 'my bath buddy'. I used some Letraset transfer letters to spell out the sentiment - you could easily have printed the sentiment, and then used some lovely aqua paper to layer onto. All in all a simple card to make, but I couldn't have done it without the talent of my friend Hannah!


Friday, 17 June 2011

Waltzingmouse Blogwaltz - 4th of July theme

Welcome to the June Waltzingmouse Blog waltz! I'm ashamed that it has been a month since my last post, but I have been very busy down scaling my craft room to a single cupboard (more details of that to come in a future post), and I haven't had the time or space to craft. It was with great joy that I got out all my stuff to make this card for the waltz. I was in desperate need of a card for a friend who has gone above and beyond and needed a little thank you for being such a star, and here is the result! I was a little reluctant about what kind of card I could make with a 4th of July theme -what with being British and all! - but I LOVE stars, and so I got cracking.
I started with my ultimate pro, and using the embossing board I embossed a large star onto white card. I wanted to create a mask, and so cute out from white copy paper a smaller star using a craft knife. I used my walzting mouse teeny trees set, and the stamp I used was what I think of as the starry tree, which is the bottom right of the photo above. I stamped this through the mask onto my embossed star using this starry tree in cracked sapphire distress ink.
Here's the star when the mask was removed!
I then sponged the edges with more distress inks and set aside.

A while back I got a bargain in Ikea after Christmas with these packs of ribbon. 29p for a pack of 20.
I think they're meant to be for hanging christmas decorations on your tree, but I just cut them up to make bows. In this case I just cut strips of white to go across the red card.
I also bought some blue napkins from Ikea that are covered in stars, and this is the first time I've used them! I glued the single layer of the napkin onto a piece of scrap card and left to dry. I then embossed a piece of red card with a fantastic Crafts Too star embossing folder.

To finish it off I had some cute luggage labels (80 for 99p at the works!bargain!) which I stamped with the tiny star from the teeny trees set, and the word 'Star' is from a set of Banana frog stamps.


And this is it all together! Sorry my photos are a little dark, but hopefully you can see the main bits!
If you've never tried masking then you should definately give it a try, as it can transform the stamps you have!
Enjoy the waltz!

Thursday, 19 May 2011

Saving Daisy Raffle

Good morning, just a quick post to let you know about an amazing fundraising event on at the moment. My friend Kirsty is arranging a HUGE (got to be seen to be believed!) craft raffle to help a fellow crafter to save her dog. For full details of the story, and ways to take part, read here.
Hope you can help!

Tuesday, 17 May 2011

Waltzingmouse Blog waltz - Masculine Thank you card


Why, hello there!
Welcome to May's waltzingmouse blog waltz, with the theme Masculine!
I had to make two thank you cards for the engineers who have been helping my 6th formers with a project, so this seemed to be the perfect masculine card to focus on.
As with all blog waltzes, waltzingmouse stamps are a necessity and so I used my teeny trees stamps! The swirly tree seemed like a good starting point, and I had the idea to do them in rows, and then do one of them a contrasting colour. I used my rolling ruler to mark out a grid for the circles, and then I stamped cracked sapphire distress ink onto kraft card - i.e the inside of a cereal box!
Here you can see I left a gap for my contrasting circle, and using a strip cut from a post-it note I masked off a place for the sentiment. I used clear ink and stamped the circle, and then also just the 'thanks' from the 'give thanks' stamp in the middle. I used silver embossing powder on this to really make it pop.

Finally I cut out the card to fit a 5" square white card.

This was a really quick, but effective card, and I enjoyed using the swirly stamp as a background stamp for the first time!
I hope you like it!

Thursday, 5 May 2011

Quick baby card

So today I have a very quick card. One of our church friends had a beautiful baby girl a couple of weeks ago, and so I was making a little card. I have made SO many baby cards, and no two are ever alike, and this one if definately unique because it doesn't feature any stars!!
I started by embossing some white card with CB Baby embossing folder. I also embossed a labels 4 die cut with a Special Touch mask. I saw a great tutorial over at ikkis cuttlebug cupboard to do this, you can see it here.
I used some pink ink to highlight the embossing, and then added some chipboard letters to spell the baby name. Some pink ribbon, and layered onto pink card and then onto an A5 white card and you're done! Quick and effective. I'm excited to see what other nesties I can emboss with my Special touch masks! I'm already thinking circle nesties and circles mask!Hope you're inspired to!

Monday, 2 May 2011

Union Jack bunting template

Well here in the UK we've had an extremely long weekend due to the Royal wedding on friday and also today being May day(another bank holiday!). We had a very laid back friday! We got dressed up in our finery and I decorated the lounge with bunting and paperchains. I bought a flag for the monkey, but he only managed to have it for 5 minutes before he broke it and then started to assault people with the stick!!

Here he is with his flag and his smart jacket. He appears to be missing a sock too!
We watched the wedding with grape juice in hand and then afterwards ate an english picnic lunch of sandwiches and scones!-and my patriotic cupcakes!
I made my bunting, having been inspired by all the banner dies and stamps around at the moment!
I started by trying to find a union jack outline...and couldn't, so resorted to my trusty Digital Scrapbook artist, which is my version of photoshop!
 I then cropped it to be banner shaped, and printed off a few copies.
I couldn't decide if I should use my promarkers, or pencil, so I did both! I decided that I prefered the promarkers for this, so printed off 6 more and coloured them too.


I used my trimmer with its wavy blade to cut them out, and stuck them to some cream card. After punching out the corners I tied with small amounts of navy blue and white ribbon!
They look super cute on the mantle piece!!!

Feel free to use my union jack image and the banner templates!

Thursday, 28 April 2011

Royal Wedding Cupcakes!

The countdown begins, tomorrow is one of the biggest celebrations our country has had for as long as I can remember! When I was 11 I had the biggest crush on Prince William, I cut his picture out of the papers and used to think that if we went to the same university then I could marry him!!!! This was all back before he became really good looking and popular!
So it was with a heavy heart that we went to seperate universities, and Gods plan was not for us to marry (He had someone far better instore for me though!!!!lol!).
I'm no royalist, but I have no issue with the royals at all, I guess I'm pretty passive about them. I'm actually a little suprised with how much I'm looking forward to the wedding. We're having a very small British tea party, with dainty sandwiches and cakes and scones. I've made red,white and blue cupcakes to really stick to the theme!!!

I started by making a standard 4-4-4-2 sponge cake mix (4oz butter,sugar,flour and 2 eggs), seperating out 1/3 of the mixture into 3 seperate bowls, and then using food colouring paste (its stronger than liquid food colouring) I coloured them.

I spooned a teaspoon of each colour into the cake cases. Plain in the centre, and red and blue on either side. You could also do it in layers (blue,plain, red etc).
20mins at 180degrees and heres how they turned out! The colours aren't as vivid as I had wanted, but its quite difficult to get strong colours into a cake.

Next was the turn of the frosting. I adapted the Hummingbird bakery recipe I saw for chocolate frosting by just removing the cocoa! So it was 300g icing sugar, 100g butter and 3 tbsp milk.
I couldn't decide whether to make it just bright white, or try to swirl through some red and blue. Eventually I decided to go the whole hog and try it! I dotted some spots of the colour paste into the white frosting before putting it in the icing bag.

I think maybe I put too much colour in, but it looks good!
I finally added some little silver balls to finish them off!
I have resisted the temptation to eat one, as I need to save them for the big day!
Enjoy your own Royal wedding celebrations!!

Sunday, 24 April 2011

He is Risen!

 
The Resurrection
Mark 16
 1 When the Sabbath was over, Mary Magdalene, Mary the mother of James, and Salome bought spices so that they might go to anoint Jesus' body.
    2 Very early on the first day of the week, just after sunrise, they were on their way to the tomb
    3 and they asked each other, Who will roll the stone away from the entrance of the tomb?
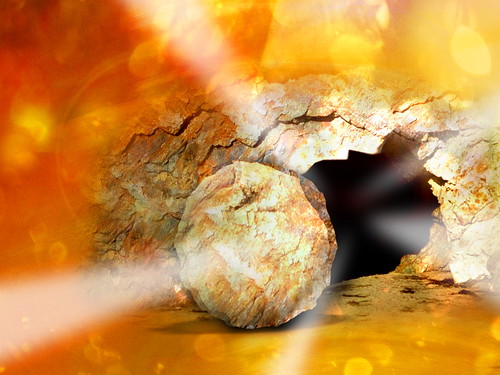
    4 But when they looked up, they saw that the stone, which was very large, had been rolled away.
    5 As they entered the tomb, they saw a young man dressed in a white robe sitting on the right side, and they were alarmed.
    6 Don't be alarmed, he said. You are looking for Jesus the Nazarene, who was crucified. He has risen! He is not here. See the place where they laid him.

As a Christian Easter is one of the most significant, if not the most significant part of the year. Without Christs death on the cross there would be no forgiveness for sin. Without his resurrection there would be no hope of heaven, as death would not have been conquered. But we can be thankful that these are both true, and that for those who trust in his death and resurrection we too can have victory over sin and death.

As our little Monkey is starting to understand things a little now he's nearly two I wanted to start some fun and relevant easter traditions. I recently read on a blog about the tradition of Resurrection buns. I was totally intrigued, and so had to read about it! The recipe is very easy to do, and has lots of things you can talk about from the recipe.

This is the basic recipe:
1 can of croissant pastry (chilled section in supermarket)
100g butter - melted
100g sugar
3 tbp cinnamon
white marshmallows (normal size)


You take a marshmallow, coat it in the melted butter, then cover in a mixture of sugar and cinnamon. You then place this in the centre of the croissant triangle, and carefully fold up the edges to completely cover the marshmallows without any gaps. The creased part will be the bottom of the bun.
You then dip the top into the butter and then again into the sugar and cinnamon mix. This then goes into a muffin tin, remember to put the folded side down.
10-12 minutes in a 200 celcius oven and they should be done.


The meaning is this:
The marshmallow is Jesus - white and pure
The butter, cinnamon and sugar  are to anoint  his body
When you cut into the finished bun it is empty, the marshmallow has 'disappeared', and this is the empty tomb after Jesus was resurrected.

I have to say they were very tasty too, and something we will definately be making again as a tradition!

I hope you have all had a blessed easter, and may know the victory of Christ personally.

Saturday, 23 April 2011

Quick Easter gift!

Well my little boy goes to nursery, and he has a key worker who is his main carer (although there are about 7/8 nursery nurses in his area). I like to make her something for Christmas/easter/birthday etc and was racking my brain for something a little different. I'm always inspired by Helen over at Its all fiddle fart for making little treat bags, and I'd already made her one for her birthday with fun kiddie sweets, so I thought I'd make a nice grab bag with some chocolate truffles in. I bought a box of Asda (walmart) chocolate truffles to use, and you get about 12 in the box, so its good value at £1.
I used my nestabilities circles to cut a nice green disc for the bottom of the gift, then placed it in the centre of some wrapping plastic. I scrunched up the sides around the chocolates and used an elastic band to secure before tieing with ribbon. I made a little tag using labels 1 nestabilities in 3 consecutive sizes. I had a sheet of easter peel offs to hand, and used one as a mask while I sponged with some distress inks. I chose the one which is like an egg with a cross in it. I think this masking looked better than the metalic peel off did. I then layered it all up, punched the corner and threaded onto the ribbon. My little mans key worker was really pleased with it, and so was I. I'll definately do something similar again!

Thursday, 21 April 2011

Waltzingmouse sketch challenge #43


Good evening, I thought I'd share a little card I made yesterday. Its a real quickie, as I only had 20 minutes max between all the many things I had to do. It was my last opportunity to take part in this weeks challenge, as I'm away from my craft room for a full week.
Anyway, in keeping with this weeks sketch over at waltzingmouse I made a simple sentiment with little embellishments.
[43-Sketch3.jpg]

I used a little Label 4 nestability for my sentiment, then used my teeny trees stamps to create some leaves. I stamped the small raindrop shape in pale green, then used the tree trunk stamp in a darker green to create the leaf veins. This picture isn't great, but it shows them before I cut them out.
I then stamped a Banana Frog sentiment onto the nestie, and gently sponged the edge with some distress inks tea dye. The top of the 5" white card was embossed with my new favourite folder, swiss dots. A nice brown ribbon, and some glue and I was done double quick!
Hope you like it!

Sunday, 17 April 2011

Waltzingmouse Easter Blog waltz


Well I'm so please to be taking part in this months blog waltz, because Easter is an incredibly important time of year for me as a Christian, its pivotal to my faith that Christ was crucified and then rose again victorious!

So I scratched my head to figure out how I could incorporate my waltzingmouse stamps into an easter card!
My idea was to use the tree stamps from Teeny trees to create a tomb scene from when Jesus has risen and the stone has been rolled away.


Here's how I did it!

I started by stamping the large oval stamp in pale yellow and warm orange. I masked the bottom half of the oval to make it look like a tomb. I then stamped the small random tree shape in a dark brown to look like the stone was rolled away. Again I masked the bottom to create the ground. I had stamped these shapes onto post it notes and cut out so I could then use them to mask for the inside of the tomb. In black ink I stamped the same random tree shape using the mask. Once I'd done this I added some trees, and then using the main oval mask I sponged the sky using cracked sapphire distress ink, and the bottom using forest moss distress ink.

This shows the masks I cut out to help me stamp my scene.

I then used my cuttlebug and nestabilities circles to cut my scene out, and then layered it onto some sage coloured suede effect  paper, also cut out with a circle die.
I cracked open my brand new Swiss dots embossing folder which I have been wanting for months, and was very kindly bought this week by my dearest Honey! Its just as AMAZING as I had hoped!
I only embossed the top part of the card (5 1/2" white card) onto which I had already printed the phrase "He is risen!" via my computer.
Inside I have also printed 'Jesus said, "I am the resurrection and the life. He who believes in me will live, even though he dies;and whoever lives and believes in me will never die. " John 11v25-26'

A quick ribbon knot and some glue and that was it!
I am really pleased with the way it turned out, especially the ingenious use of the teeny trees stamps to create the scene!-even if I do say so myself!!!!!
I hope you like my card, and have a blessed easter, reflecting on Christs sacrifice for us.