Wednesday 29 December 2010

Quilted Cushion


For my sister in law I wanted to make something special this Christmas, and as she and her boyfriend are currently doing up a house - complete with craft room - I decided to make something for the new house. I found out the colour scheme of the craft room and decided to make a quilted cushion. I got a few books out of the library, made my own design - based around a very popular star shape- and set about making it. I found it very satisfying doing this, it was much quicker than the advent calender to put together!
The front has a panel of stars with buttons, a strip of plain fabric, then stripes of varying widths in colour.
The colours remind me of sherbet!
I made the back to be an overlap fastening, and used two odd buttons to close it. I decided on this rather than a zip as it looked a little more classic. I made a small label to put inside with a beehive stamped on it!
I'm really pleased with how the cushion looked, and am quite confident on doing more quilting in the future!

Tuesday 28 December 2010

Flannel Cupcake

Heres my first attempt at a cupcake gift. I wasn't sure whether to try socks, or flannels, but as a last minute decision to make them, I figured that flannels were easier.
I watched a video on youtube, and it was suprisingly easy to do. I downloaded a template for the cupcake case, not sure where from now, and then printed it on some Christmas 12x12 paper. I used my nestabilities labels 4 to cut out the label, and stamped a Christmas sentiment. It looked a little sparce on the top, so I cut some green felt into holly leaves - freehand! - and then made berries using a red pipe cleaner.
The cupcakes looked very cute, but to be honest, didn't hold together that well, maybe a pin in the side would have helped? I was also at a loss as to how to give them, to wrap or not to wrap??? I decided in the end to just give them as they were. Heres the template if you're interested.

Sale Shopping!

Today we hit the sales, and top of the list was hobbycraft! It was incredible, they had so many bargains!!I also picked up some great bargains in John lewis!
This first picture shows some bargain background paper (John Lewis wrapping paper that was reduced to 25p and 10p!bargain!), some glitter beehive paper, male matt stack papers, 50 square cards and envelopes (I'm really liking easel cards at the moment, and tend to do squares, then have to make my own envelopes, so this seemed like a perfect solution!), the very top right you can see some card bags, but the shape is the same as the pretzel bags that Helen over at http://www.itsallfiddlefart.blogspot.com/ uses regularly, so had to get some as they were half price. The bottom right is some East India string and some ribbon adhesive.

This photo shows lots of stuff. Theres everything from brads, chipboard, rub on tranfers, self adhesive ribbons and double sided tape!

Here are my lovely new stamps. Stamping is still my favourite, so I was very excited to get these all at bargain prices. I was also absolutely thrilled to find my embossing pens. I've searched high and low for them, and they finally turn up in a sale bin! I managed to get one clear, and then a yellow (which I can use for gold embossing) and a dark blue. Only 49p each!

I managed to get about £90 worth of stuff for £30. Its so exciting. I'm looking forward to having a play when I next have chance!

More Christmas presents!

Oh the excitement!!!!!
This year is the first I've been very specific about what I wanted for Christmas, and although it spoils the suprise its actually quite exciting knowing whats coming next!
Heres my Christmas day stash:
an embossing folder - stars
2 Xcut impresses folders (christmas tree and sunflower)
2 Xcut impress border folders
2 Xcut stencils - Hopefully when I get my No more Shims mat I'll be able to emboss these too!
A  stack of Funky Vintage paper.
Not in the picture, but also received were a set of Promarkers, and 3 distress ink pads (tea dye, forest moss and sapphire). I'm so excited to have a go with them all!!!

Wednesday 22 December 2010

My presents!!!!

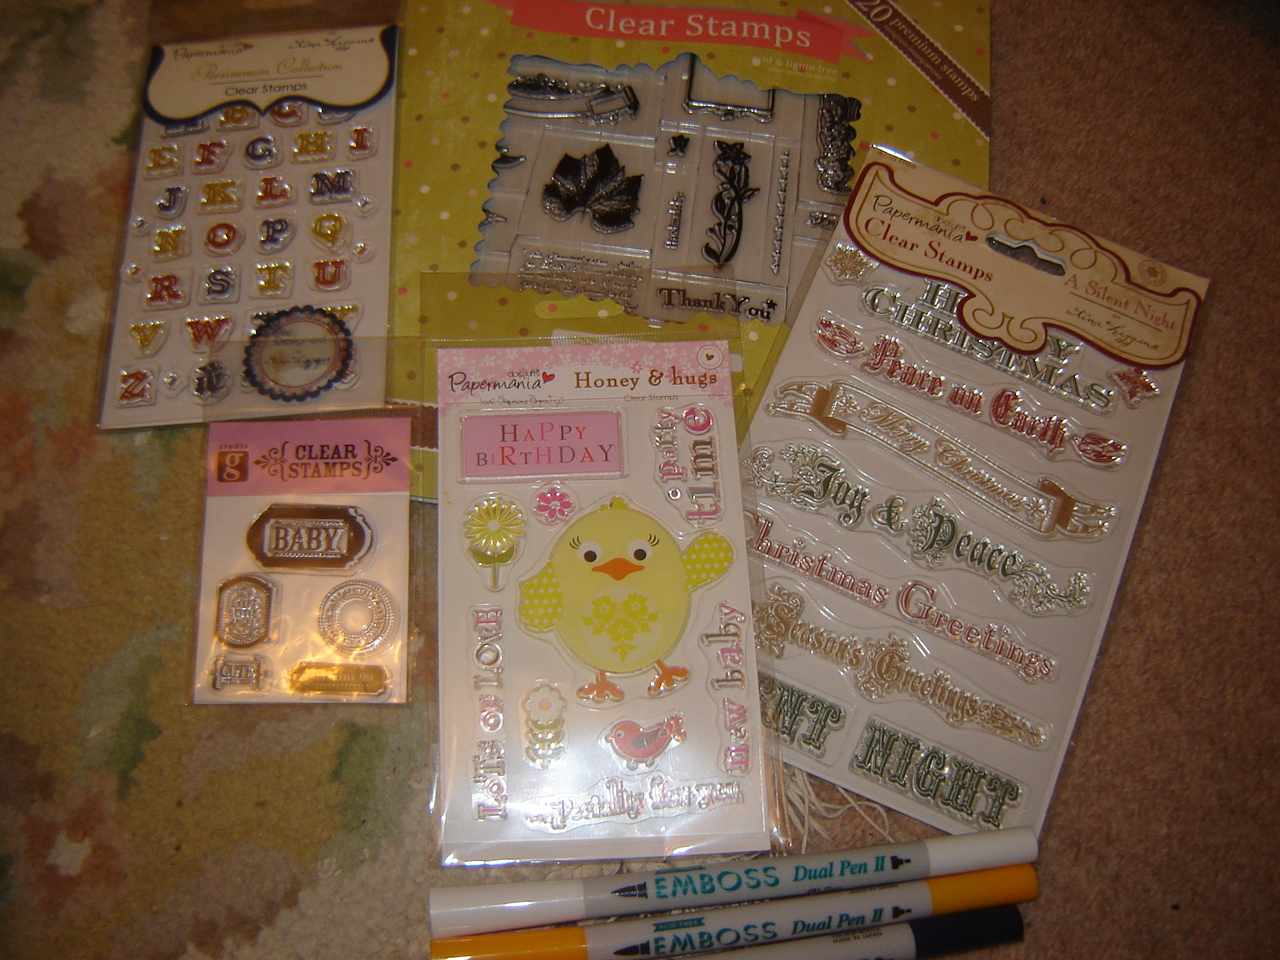
Now before you say anything, they're not Christmas presents, these are my birthday presents!!! This is the start of my craft haul which will continue on Christmas day. Honey was given the task of organising everyone with what to get me, and so far, so good!!!!
The centre piece was my gorgeous cuttlebug! All the other bits kind of revolve around it!! I got 5 embossing folders (Baby, snowflakes, stylised flowers, divine swirl and another I can't remember!), 3 sets of nestabilities (large circles, labels 1 and labels 4), cuttlebug square frame dies and a cuttlebug man shaped die.
I've had lots of fun playing around with them - especially as we had a snow day on my birthday which gave me an excellent opportunity to have a play whilst monkey was at nursery- and had put them to good use already making tags for christmas and I'm so excited for after Christmas when I can have a really good play around!These first tags are based on the ikea wrapping paper I bought, its great as its reversible, and has this lovely stripe on the back which I've attached to some black card. The larger tag also has a glitter snowflake, which I got a pack of 8 from Home Bargains.
These next tags are all based on some really cheap asda wrapping paper. I attached it to cream card, used a gold ink pad to edge it and then used a variety of my smallest nestabilities dies and stamped christmas words on them. The bottom one has a digital stamp which I made on DSA2 and printed. It was much harder than I thought getting the die to cut exactly round the circle! I then stamped a postmark in gold and embossed.
The next tags are all backed with burgundy cardstock. The top two have the digital stamps and then I've stamped with christmas images and embossed. The bottom tag is just some gold paper embossed with the Divine swirls folder.
Below we have various snowflake tags. I was just playing around with what I liked best. Using only a quarter means they go much further, but I'm still undecided which looks best. The top left had a gap along the side where the embossing folder (cuttlebug snowflakes) finished, so I stamped the sentiment and embossed. The cardstock is electric blue pearlised card.
Unfortunately I can't figure out how to rotate this next image, I should have rotated it before posting! oh well. It shows two tags, both made from a little embossing folder which I got free with a magazine recently - I wish I could remember which one actually, because it came with some really nice Christmas stamps aswell, the sentiment on the card was included! I did two different sizes just by using the top of the tree image. It looks good though any size. I then used a gold pen to go over parts of the embossing. I layered the image onto cream card which I had embossed the edges of with gold embossing powder.
I don't think any of the 40 tags I made where the same, but it keeps it interesting that way!
Next thing I was to do is some snowball gifts and cupcake flannels, so keep watching!!

Thursday 16 December 2010

Christmas Cards done!

So I have finally got round to making some Christmas cards. I had intended to make 15 for very close family and friends, but as most needed posting out I decided to cut it to 8 as I was concerned I would miss the last Christmas post otherwise! I always try to make sure my Christmas cards put across the true meaning of Christmas, so this year I chose the two ideas of 'Prince of Peace' and 'Star of wonder'.
I couldn't decide which I wanted, so did a background paper for both. I used my Digital Scrapbook Artist(DSA) to design the background paper using key scriptures (Isaiah 9:6 "They will call Him Wonderful Counsellor..." and Matthew 2 "We saw his star in the east") and then printed them off.
I haven't got my cuttlebug yet, or my spellbinders dies (only 4 more days til my birthday though!!yey!!) but I fancied a label 1 die shape. Luckily the DSA had a similar shape, so I printed off some to use.


 For the next few I used some inchie squares and alternated the colours and the images. I stamped images in clear ink and then used clear embossing powder. When I added the ink with the makeup sponge it left the image. I really like this technique. I did find though its only effective with darker inks. This Joy/Peace background paper is from a mat stack.
 I really like how this came out. Its supposed to represent Prince of Peace, but Honey said "King of peace" which doesn't make as much sense, but I guess means the same! I prefer the first one of these in terms of the shading.


I played around with the star of wonder label and used various inks to shade it, so none of them are actually the same. This final picture is my favourite. I used gold ink on the label, and although it doesn't look gold it does look really vintage. Theres also a burgandy band of organza ribbon across the centre.

I hope you like these and maybe inspired. Hope you have a good Christmas.
"For to us a child is born,
   to us a son is given,
   and the government will be on his shoulders.
And he will be called
   Wonderful Counselor, Mighty God,
   Everlasting Father, Prince of Peace.
7Of the greatness of his government and peace
   there will be no end.
He will reign on David’s throne
   and over his kingdom,
establishing and upholding it
   with justice and righteousness
   from that time on and forever. "
Isaiah 9 v 6-7

Sunday 12 December 2010

Masculine card with embossed background

Well I thought it was time to post a card, and here is one I made for my Honey for his birthday last week. I wasn't sure what I was going to make, but having been inspired by http://stamptv.ning.com/video I had a few techniques in mind that I wanted to play around with. The first was the embossed background. I used my Ultimate pro to score a horizontal line towards the base of the card, then some diagonal lines across the rest. This gave a lovely crisp background. I then stamped the bee image onto some watercolour card and heat embossed with clear embossing powder. Using a makeup sponge I added 2 shades of blue ink (royal blue and sky blue) to the image, which gives a lovely effect. I matted this onto a white cardstock, then navy blue cardstock. I used the makeup sponge to go over the embossed lines on the card for a little bit of colour, and finally stamped the word "honey" in the bottom corner using individual letter stamps.
I like the way it turned out, and will definately be using the clear embossing technique, and the background techniques again. Sorry for the poor quality photo, hopefully I can get a better picture next time!

Saturday 4 December 2010

Finally!

I am pleased to say I have FINALLY finished the Advent quilted calender. It really was starting to challenge me towards the end, the binding was like my nemesis! I messed up the mitred corners and had to remove a section of the binding, but I then struggled to attach the new binding properly. I guess I'll learn from these little errors though and be able to handle them better next time. I even managed to find the doweling and caps at Hobbycraft on thursday which was a great relief too. The picture shows it hanging up in our living room, the bottom doesn't want to hang straight, but I have no idea how to remedy that, I'm hoping over time it will just settle. I'm really pleased with how its turned out - eventually!- and am sure it will become a well loved piece of our Christmas family traditions.
Talking about Hobbycraft, we popped in to see if they had some quilting fabric (which they did but FAR too expensive for what I need it for) and doweling, and I ended up buying so much of their sale stuff!
I managed to get some cuttlebug dies and embossing folders, some stamp sentiments, some flowersoft (which I've never used before, but at £2.99 for 7 pots I couldn't resist!) and motifications, and also a few embellishments. I was like a kid in a sweet shop! Most of the stuff is being added to my Christmas/Birthday craft presents that Honey is organising for various family members to give me. They are on top of my new Cuttlebug, Spellbinders dies, Tim Holtz distress inks, Promarkers and stamps!I'm so excited!
Anyway, I'd better go.
Hope the Christmas preparations are going well, and we can keep sight of the true meaning of Christmas amongst all the other things.

Thursday 2 December 2010

Advent..but no calender!

I'm so disappointed that I haven't been able to post the final advent calender photos yet, but alas, it is not yet finished. I was right on track for finishing it on the 30th Novemeber,but the binding was still causing me issues. It was the mitred corners really that were the problem. They looked fine on the front, but the back was a right mess. I think I hadnt attached the binding quite correctly, so ended up with too much binding over on the back. To try and balance this out I stitched one of the corners of the binding and cut it out (do NOT do this). This was a HUGE mistake, and now I've had to unpick about 8inches of binding, and will have to somehow insert a new section of binding. Thankfully the monkey doesn't understand advent yet, so if we start with the calender a few days late he won't notice. I've also found it difficult sorting out the dowel ends. No where close seems to stock them, and I'm not prepared to pay £4 postage on 80p worth of goods! For the moment the dowel will just have to be rough edged! I have seen some lovely shelf hangers though which would look lovely in a bedroom.
I really have caught the quilting bug!