Thursday 22 December 2011

First Christmas Cake

Well today I made an unfamiliar cake, a Christmas cake. I'll be honest, my baking is quick and easy, not something that can be said about Christmas cake (it took 3 1/2 hours just to cook it!), but when I saw a BARGAIN in Sainsburys I couldn't resist. They had a Christmas cake kit reduced from £12.99 to.... £2!!!! It had everything you needed to make the cake (flour, fruit, nuts etc) amd you only had to add butter and eggs, and decorations, but those were things I already had.
So today I had the time set aside to make it, and another Ann Pickard inspired idea for the decoration. I even found a tutorial on Youtube to show you how to make the snowmen if you haven't seen her before. Its here.

Anyway, here it is, in all its glory! I added some coal to their bellies, but unfortunately the food colouring ran a little bit. Think I was a little too liberal with it!
As this may be my last post before Christmas I'd like to wish you all a very blessed Christmas time, and I pray you would know the joy of Christ this season.
Happy Christmas!
Bethan x

Sunday 18 December 2011

Painter and Decorator 60th Cake

Well today is my dads 60th birthday, and I couldn't let the occasion pass without making him a special cake.
 He's a painter and decorator by trade, but for the last 25 years has run his own wallpaper business, so when I saw Ann Pickard make a painter cake a few months ago on Create and Craft it stuck in my head. I only thought about making this cake a week ago though, and by then it was too late to order the book, so I just went from memory.
  I also wanted to incorporate the fact that my dad is a huge Burnley FC supporter, thus the scarf around the edge and paint colours.
 Although my dad loved the cake, his first comment was "you could have given me more hair!"
Here you see his little painters overalls.

The letters on the paint can and the numbers on the top were cut using some alphabet cookie cutters I've had for years.
Just like the penguin cake I made for my husband the top of the cake is completely separate, and can be removed, as we're saving them for our birthday party in January.
Hope you like it!

Thursday 8 December 2011

Final Candy Winner

Well my bloggiversary celebrations are now officially over, and this weeks winner is Maz, who won by default!

I have to apologise for my lack of posts recently, but card making has been on a back burner to cake baking, Christmas shopping, work and general busyness. I'm hoping to make some tomorrow night when Honey is on his works Christmas do, so watch this space!

Friday 2 December 2011

Happy Birthday Penguin Cake!

So today is my lovely Hubbies 30th Birthday. Unfortunately he hasn't been very well, and we had to cancel his birthday takeaway and family coming round. I had already made his cake though, although we haven't had a chance to sing and put the candles on.


Following on from making Monkeys cake for his birthday (the badger cake can be seen here) I was really sad to cut up the top, and actually took off the badgers and kept them for a while. Afterwards I saw Ann Pickard on Create and Craft teaching people how to make sugarcraft models, and she suggested doing the main sugarcraft on a separate board to simply sit on top of the cake. So this is what I did! The ribbon around the top is to conceal the join, and I will be able to take off the penguins and keep them for our birthday party which is in a months time, but also to keep for as long as I have somewhere to put it!!
As I said before, I watched Ann Pickard on C&C, and these penguins are made to her instructions. I couldn't decide how to have them all on top, but eventually decided to sit some on little ice blocks, and to make a hole in the ice. Finally I thought it was missing something and made some little fish and a little fishing rod.

Thursday 1 December 2011

Final Blog candy and winner 3!

Well we're in the final week of my Bloggiversary, and for my last little giveaway I have an Emma Thomson Dandelion stamp of Dandelion in the bath. I can imagine this on a new baby card, or a relax and enjoy yourself card. All you have to do to enter to win this stamp is comment below. I will announce the winner next week on the 8th December.
Last weeks winner of the Bazzill basics embellishments was Maz. Congratulations!

Wednesday 30 November 2011

Candle Stamping Part 2

If you haven't already, you have a little time left to enter this weeks candy here.


Earlier this year I saw a great idea of stamping candles for presents, you can take a look at my first attempt and also a tutorial here.
I have made a few recently and thought I'd share them!

The first one was for a friend who's my age, and I used some of my new Minds Eye stamps Bloom and Grow stamps. They're a lovely selection of leaves, flowers, birds and sentiments. I started by stamping all the images I wanted to have on the candle onto tissue in Forest Moss distress inks. Here they are all laid out ready to attach.

Next is the finished candle, with its matching tag.

And finally it all wrapped up. I think the tag was a little big for the size of the candle perhaps!


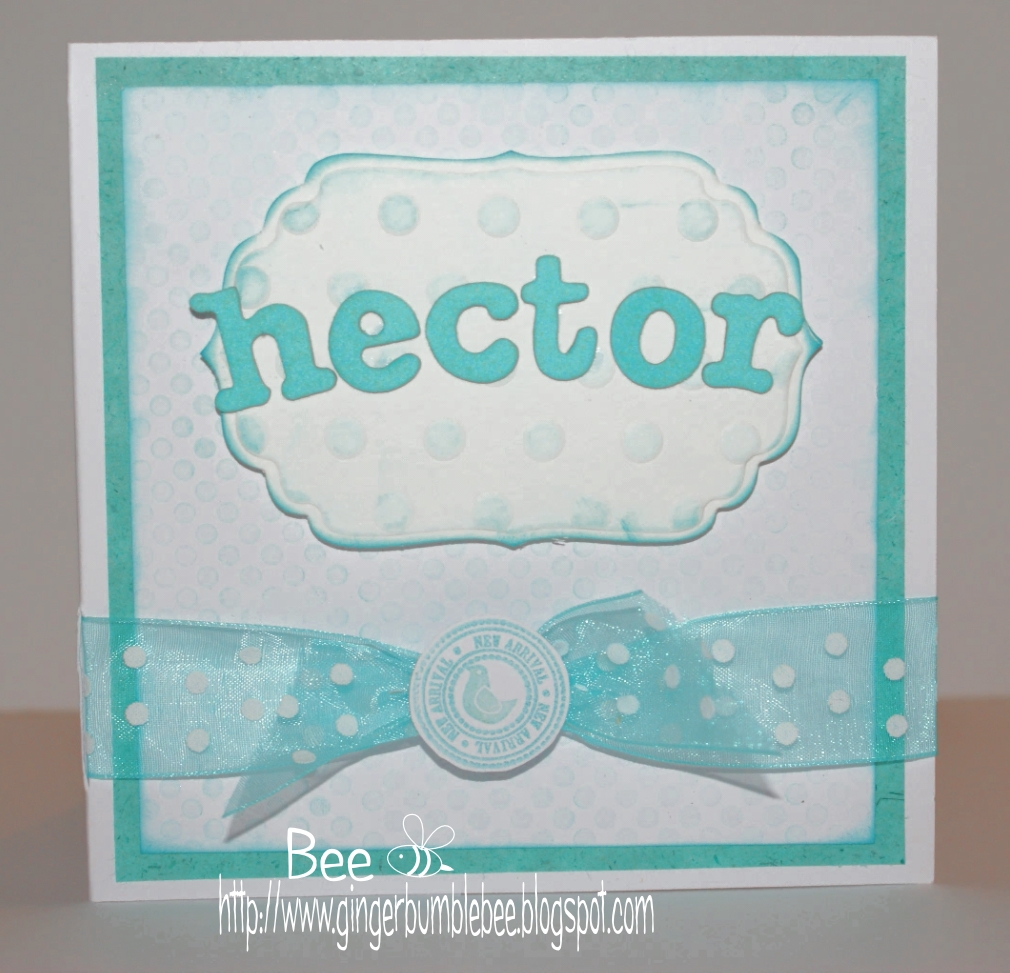
Next was a present for my friends daughter who was turning 16. I wanted this to be a little bit trendy, and wanted her name on it. I used a whole variety of stamps for this, so there are Waltzingmouse polka dots around the top and bottom (Offbeat backgrounds), a Banana frog frame for the name plate (can't remember which set!) and then just some cheapie alphabet stamps for the name.

The name plate is being held on either side by a Kirsty Wiseman Lila Bug, and the hearts are from a freebie set I got with a magazine. I think it looks good in black ink, more trendy!

 At the back I have indulged and put a little Stampendous bee!
Finally is a little candle I made for myself. Its very simple, but I wanted it for Christmas. The sentiment is from Papermania Christmas sentiments A Silent Night. The lovely vine like top and bottom are from the Minds Eye Bloom and Grow set. This was very quick to make as I kept it simple, and would make a lovely advent gift for a friend.

Why not try some candle stamping with your favourite stamps this Christmas, you can even make coordinating packaging and cards!

Wednesday 23 November 2011

Blog Candy 3 and 2nd winner

Welcome to the 3rd Prize in my Bloggiversary. This week I have some Bazzill Basics Embellishments to give away, including gemstones, flowers, and die cut edging strips in a variety of shapes.
To enter to win these all you have to do is comment below. The winner will be announced here on the 1st December.

Last weeks ribbon was won by Rachel W K

Waltzingmouse Sketch Challenge 74 - Baby Card

There's still time to enter my blog candy for some gorgeous ribbon just by commenting over here.
#74 Sketch

Welcome to this weeks Waltzingmouse Sketch challenge. Here is a new baby card for our friends, and I'm just dotty about it! 

The main image is a labels 4 nestability which has been embossed with a mica mask to give the polka dot effect. The background is stamped in a polka dot pattern from Waltzingmouse Offbeat Backgrounds. The tiny little element at the front is a StudioG 'new arrival' stamp with a waltzingmouse teeny trees bird in the centre.

To visit the sketch challenge blog just click here.

Lila Bug Monochromatic with purple birthday card!

I hope you're all well, there's still time to enter my blog candy for some beautiful embellishments just click here.


Here's a card I've made for a friends daughter who turns 16 this week.

The main image is a Kirsty Wiseman Lila Bug which has been stamped with black Memento and then coloured with promarkers. The white circle she is sat on has been embossed in the cuttlebug with a circle mask and then cut with my nestabilities.  To make sure my background circle matches my Lila bug I actually cut a white piece of card and just coloured the edges with the same promarker. The background paper is a very old Mat Stack 6x6 pad I have, and finally I added a sentiment and some ribbon.
This is being entered into this weeks Speedy Cats Friends Challenge #82  to use Black, white and one other colour (purple! or amethyst if you are being particular!)

Thursday 17 November 2011

Waltzingmouse blog waltz - Winter/Christmas

If you'd like to have a chance to win some blog candy ribbon leave a comment over on my bloggiversary post here.Click for Deets


Welcome to this months waltz!


The theme this month is winter/Christmas, and what better set to use than the ever versatile teeny trees. I remembered seeing someone on the gallery use the teeny tree trunks to make a snowflake shape and I knew thats what I wanted to do. As I'm a little short of time at the moment I decided to combine a few challenges, and also to keep it simple. I decided to do a kraft tag with white embossed stamping.
Its all pretty self explanatory, I used the smallest of the tree trunks, but all of them would make a snowflake shape. I used versamark to stamp with, and white Wow embossing powder. To finish it off I used some antique linen distress ink around the edges and some gingham ribbon!


Wednesday 16 November 2011

Blog Candy 2 and 1st winner

Welcome to week 2 of my bloggiversary. The candy I have on offer this week is a must for all crafters - luxury  ribbon! This is a pack of beautiful VV Rouleaux mixed ribbons. There are a mix of striped ribbons and some ribbon with contrasting edges.
To enter please leave a comment below. The winner will be announced next week on the 23rd November.

The winner from lasts weeks candy (as chosen on random.org) is Fiona. Congratulations, the Hero Arts stamps will be winging their way to you!

Can't give stuff away!

I can't believe that I have only 3 comments on my blog candy post. I have over 50 people visit my blog every day, and in a week only 3 people have actually commented on the post about the lovely hero arts stamps. All I can say is that my faithful followers have a very high probability of winning something!!!!!

Saturday 12 November 2011

Baby card - Waltzingmouse sketch challenge #73

Image(21)


For todays Waltzingmouse sketch challenge #73 I have made a baby card for a couple at church who have just had their 2nd little one.
I used some pink chipboard letters for her name (although I didn't have an 'e' so had to make a 'c' into one!) and made a little banner for them to sit on. I used my Labels 4 nestabilities and my cuttlebug embossing folder to make the central piece. I used a technique where you first cut the shape from the card, then place a mask, or in this case I just used half of a cuttlebug embossing folder (by opening it out fully) on the non cutting side of the die, and then a No More Shims embossing mat on the other side and run it through your cuttlebug again. This has the effect of embossing the label, but leaving a nice clear edge. I inked this up with some pink ink to make the embossing stand out. I'll try to do a tutorial on this sometime soon, as its a technique I use alot, and having bought loads of new masks at NEC I'm sure I'll be doing more!!

I used my Waltzingmouse Offbeat backgrounds to stamp the stitching around the edges, the background paper being some Papermania mistletoe kisses. Its a very subtle pink stripe. I also took a tiny label and stamped onto it a 'new arrival' stamp from studio G. I then stamped an adorable little bird from Waltzingmouse teeny trees set in the centre. Some ribbon and a button finished it off nicely
.Remember to head over here and enter my blog candy if you haven't already

Background cupcakes

.


Here is a card for a friend who's birthday is coming up. I made the cupcake embellishment a few weeks back by doing some paper piecing with some scraps, but wasn't sure how to move forward with it.
I used some lovely Hero Arts birthday stamps to stamp the tiny cupcakes in the background with tea dye distress ink and masked off a border round the edge. I then used a promarker to outline my background.
The scraps I used are some Basic Grey pieces I had left over from this card I made earlier in the year, but not wanting to throw anything away I kept the tiniest pieces! I stamped with some black memento ink with the large cupcake stamp which came in a tiny set from We R Memory keepers onto the scraps. I then cut them out and layered them up. The cherry on top of the cupcake has had glossy accents added for a little extra dimension!
 I stamped the Hero arts sentiment with some more memento and then added some self adhesive ribbon. Hope you like it!
This card is being entered into the Artistic Stamper Backgrounds challenge

If you'd like to enter my bloggiversary candy to win a beautiful set of Hero Arts stamps then look here.

Friday 11 November 2011

Red and Orange Stars - Less is More Week 40

The challenge over at Less is More is to use Red and Orange, reflecting the colours of bonfires and fireworks. I decided to add in a little yellow too, but I'm sure they won't mind!

I used a really useful tip Kirsty Wiseman gave me, which is to use your promarkers to colour scraps of white card for punching, this means you can always have coordinating die cuts or punched shapes to your projects.
I also used this technique to make a mat for my main stamped Birthday sentiment. The background sentiments and the main sentiment are both from a lovely birthday Hero Arts set. Each of the stars I embossed in my cuttlebug to give a bit of extra texture, added some yellow polka dot ribbon and added some faux stitching around the edges with my orange promarker! voila!
If you haven't already you can enter to win some blog candy here.

Remembrance Day


In the UK we celebrate the 11th of November as Remembrance Day, as it was the official end of WW1. Originally it was to commemorate those people who died serving our country during WW1, but more recently it has come to be a time to remember all those who have suffered or lost their lives serving our country in many wars.
The poppy is a symbol of remembrance worn by people around the country to unite in this remembrance. The poppy being significant because in the battlefields the poppys bloomed.
I have seen an increase of handmade poppies over the last few years, with felt, crochet and even diamond poppies being worn, but Helen over at Its All Fiddle Fart inspired me to adapt an official poppy.

I originally thought of just clear embossing it, but having been reminded of Zentangle at this weekends Hobby Crafts show I thought I would give this a go.
Zentangle is just doodling, but in small sections of repetitive patterns. 
Why not have a go yourself at customising a poppy, if you use the official ones then all the funds raised still go to the Royal British Legion!

Thursday 10 November 2011

Fall card - Get well soon

Here is a card I made as part of the Speedy the Cats Friends Challenge #80 - Fall or winter.

I chose Fall as I'm still loving all the beautiful colours. I used one of my favourite tree stamps (from Crafty Individuals), stamped in memento black ink onto a white tag and then inked with distress inks (antique linen and tea dye). I used some Dovecrafts Funky vintage paper in the background and placed onto Kraft card base. The final touch was to stamp a Waltzingmouse teeny tree sentiment onto some more craft and cut to make a ribbon shape.
If you haven't already you can enter my bloggiversary candy over here.
Thanks for stopping by!

Bloggiversary! Candy 1

Welcome to my Bloggiversary post! One year ago I tentatively set up my blog, not really sure what I would end up doing with it. After my mum died I spent a lot of time online just looking at random sites, and then found blogger. Eventually I felt I would like to start my own blog as a record of the crafting I was already doing. I also wanted to pour my time into something which I loved, and Its been a crazy year, and I've been well and truly converted to blogging, obsessed with blog hops and inspired by lots of challenges. My craft style has changed slightly and (I think) improved a little. I enjoy getting an insight into so many crafty people's lives, and enjoy comments people leave about my posts.
To mark the one year anniversary of my blog I am offering a little candy. For the next 4 weeks I will have a blog candy give away every week, open to entries from anyone who leaves a comment on the post. Within the 4 weeks I will also be celebrating my 100th Post, so there will be a giveaway for that too! I have always intended to have a giveaway for reaching 25 followers, so whenever that happens there will be another giveaway!
So here's the first giveaway! A beautiful set of Hero Arts Christmas Stamps.
To be eligible for this prize you need to comment on this post, you don't have to be a follower, and come back on the 17th to see if you have won. The winner will need to email me with 48 hours of the prize being announced or another winner will be chosen.
I hope to hear from you soon!

Sunday 6 November 2011

Post-Card!

Good evening! I'm just popping in to post a Post-card. The challenge over at City Crafter Challenge Blog was to make a postcard, but I decided to make a Post card instead - you see the difference?!!!
I had a lovely background paper I had downloaded from here, Cathe Holdens website Just something I made. It is jam packed with amazing graphics and freebies to download, please go and have a look around, as I'm sure you'll find something you like.
Onto my card. I printed off the pdf of the french postmarks and then inked around the edges with some distress inks. I have a small stamp die which came with my cuttlebug, so I die cut some little stamps onto which I could stamp some sentiments like 'happy birthday', 'just a note' etc. I also had a batch of small labels 1 nestabilities which came from the centre of some frames I made back on my easter cards.
These where very useful to layer the stamp shapes onto.


I finished the card with some beige/brown grosgrain ribbon.


Friday 4 November 2011

Young Crafters Unite Masculine Card Blog Hop

Welcome to this months Young Crafters Unite Challenge and Blog Hop!

You should have arrived here from Jen over at one of my favourite blogs Our Change of Art.
If you arrived here some other way and want to visit all the blogs you can start from the beginning by clicking on the banner above.
Onto my card!

This months challenge was to create a masculine card, and I wasn't sure what to do, but I'd seen some lovely clock stamps at the weekend which inspired me. I have a craft software called Digital Scrapbook Artist and I knew I had one digital clock image in the Enchanted digikit I could use. I made myself a digital background using the one clock face and also some text from a digital set called Old Text by Vinnie Pearce.
I wanted to use some mica sheets I'd bought a while back from the QVC outlet. You peel off the sheets in layers and then you can stick images between them or even make small pieces of jewellery from them. They're made naturally, so they are not uniform shapes, but that what makes them unique!
I made myself another digital collage using the clock, some cogs I found on google and just typed happy birthday over and over again!
 I then sandwiched it between two pieces of the mica sheet and used some glossy accents to stick it. I then cut around the mica. It doesn't show up too clear on here but its so glossy and shiny!

Finally I found some sequins I had which I'd bought to make my hubbies anniversary card (It was our copper anniversary) and searched through for some 'cog like' ones. I attached these to look like they were coming from the watch.
I hope you like my take on the masculine theme!

You can continue the hop over at Samatha M's Blog.

I hope to see you again for next months challenge!