Showing posts with label embossing. Show all posts

Tuesday, 19 November 2013

CAS summer Thank You card


A simple yet classy card to say thank you. A little bit of embossing goes a long way, especially on white card, and swiss dots is one of my favourite embossing folders.
As you may realise, green is my go to colour, and this great polka dot washi tape from Fantastic Ribbons really works well.

Stamps: Waltzingmouse Country Labels 4
Ink: Memento Black, Bundled Sage Distress ink
Dies: Spellbinders Labels 4
Embossing folder: Swiss dots
Washi tape: Fantastic Ribbons Green Polka
Card base: Cream A5

This is being entered into the Lawnscaping Challenge #70 - Polka dots

Saturday, 5 October 2013

Give Thanks to the Lord Cherries Card


This was a card I sent to Lebanon with a care package of the new Cadburys marvelous creations chocolate for a good friend of mine who is out there helping engineer some projects.

We met when we were both 18 and taking a gap year before university and doing a Year in Industry at different engineering companies, but right next door to each other. Why did we hit it off? Because we both had WWJD bracelets on and had an instant connection.

I was excited to break out my Country Labels 4 stamps again, and especially these super cute cherries.
I stamped the background cherries using Memento Lady Bug ink and pearlised green ink. I used the same green to stamp the labels 4 shape and also on a scrap of card I stamped an extra cherry to fussy cut to embellish. I cut the labels 4 with my Nestabilities die, and a larger one to layer onto which I embossed with Cuttlebug swiss dots. Some lovely dotty ribbon and  layered onto black card and it was finished!

Wednesday, 4 September 2013

Peter Rabbit First Day of School


This week was my son and nieces first day of Primary school. The card I made for the Waltzingmouse Pajama party here I gave to my son. For my niece I cracked open a new stamp set from Crafters Companion and printed this Peter Rabbit, and coloured with Promarkers. I used my Country Labels 4 stamp for the mat, and also the tiny apple stamp from Teeny trees for my background (I thought it tied in well with the school theme). I cute the mats with Spellbinders Labels 4 and embossed with some circles. Some tiny buttons to embellish it finish it off.

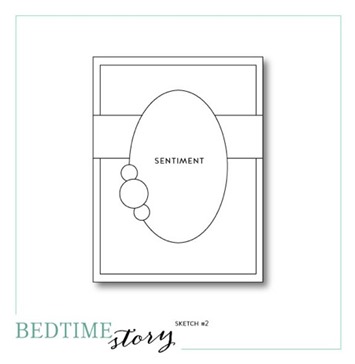
This card is being entered into the Waltzingmouse Bedtime Story Sketch
PAJAMA-PARTY-sketch-2

I hope you like, and please go look at the other entries into the sketch challenge.

Friday, 30 August 2013

Waltzingmouse Pajama Party

PAJAMA-PARTY-LOGO


I'm excited to be taking part in this months pajama party, especially because I wasn't sure I'd be able to play along, partly due to time constraints, but also because at first glance I couldn't come up with anything for the 4 categories. In actual fact I started to come up with an idea, and it led me to try and incorporate all 4 challenge themes in one card!

The themes are:
1. Tie a knot in it
2. Get Nauty(cal)
3.  Colour inspiration
4. Golden Oldie stamp sets.

So here's my card

So here's how I did it.
I stamped the cloud shape in versamark, from my oldest WMS set,(the awesone Teeny trees!) I think its a tree outline, but it makes a great cloud!  I heat embossed with white embossing powder to act as a resist to the blue ink I sponged for the sky. 

I used my Silhouette to cut the pirate ship(I bought the file from the silhouette store), and then stamped some detail onto the ship using an Offbeat Background stamp to look like planks. I also sponged the sails and added the pirate detail to the flag. 
I cut some blue paper with Spellbinders edgeabilities scalloped borders and then stamped onto it with another Teeny trees stamp to give a wave effect.

I added some extra details with a burgundy crows nest, some Card Candy gold port holes and a hand made anchor.


Here's how I met the challenge themes:
1. Tie a knot in it - My anchor is hand made from silver wire and twisted and knotted. It took me a couple of attempts to get it to look like this!
2. Get Nauty(cal) - The pirate theme!
3.  Colour inspiration
4. Golden Oldie stamp sets. - My oldest WMS stamp set is Teeny Trees.

I hope you have enjoyed seeing what I created, I love to hear your feedback. If you'd like to see what everyone else made pop over to the Waltzingmouse blog.

Thursday, 1 August 2013

Happy Everything Goes!


Here is a card I made for my sister in law whose birthday is tomorrow. After being inspired by the recent Pajama party to use my Folk art medallion set with some vivid colours I set about finding the perfect combination of colours. After some experimentation I decided to go for Distress Inks in Seedless Preserve, Forest Moss and Chipped Sapphire.


I took the tiny pennant from the set and stamped along the central section with alternating colours.
I also embossed some purple card with Swiss dots and stamped an extra medallion and some leaves for embellshmenst. Finally the sentiment is Paper Smooches from the set Simply Said.


I'm entering this into the Waltzingmouse Pajama Party Bedtime story sketch


and the Paper Smooches Anything goes challenge


Monday, 1 July 2013

Pretty Banner Card

Here is the card I made for my beautiful niece who was 1 a few weeks ago. This card is almost entirely made on my silhouette.


First I cut a number 1 from pink card and embossed it with cuttlebug Swiss dots. I also cut a coordinating white number 1 to layer onto. I also cut little banner triangles from white card, and some patterned paper I got in a magazine last year, each one with a letter of her name. 


I placed some pink card behind the letter banners to make them stand out. Each little banner is attached to some twine so it falls like a real banner.


Sunday, 2 June 2013

Vintage Wedding Card WMS


I think I have a new favourite stamp set. I have fallen in love with the new Waltzingmouse Folk Medallion set. It is so versatile, and I am excited to see all the different ways I will be able to use it. After the blog waltz I had pinned lots of different images onto my pinterest board, and I totally CASEd this card from Karin here. 

I stamped the main image in versamark and heat embossed with WOW fine white embossing powder, I then chose some of the smaller medallions (of which there are many, and so many combinations you can use!) and stamped them in a variety of browns. I was stamping onto the card which you find in the centre of wrapping paper! I then sponged this and layered up onto some white, brown and then kraft card base.

Friday, 10 May 2013

90th Birthday Wine Bottle card

I can't imagine that many people will ever need to make a 90th birthday card, but I wanted to make one for one of my husband relatives,
He used to run a pub, so wine seemed a good theme (plus I wanted to get the year of his birth on the card, and a vintage bottle of wine seemed perfect!).


His last name is Lock, so that got on there too. 
The background paper is wallpaper from the lovely Galeria Memories.


I cut the numbers and wine bottle on my Silhouette. I bought the bottle template from the Silhouette store, which for 33p I thought was worth it.
I even did the print and cut for the label which was cool. 
I finished it off with some gold embossing on the bottle label and the numbers.
I think this makes a great masculine card, or for anyone who likes red wine!


Tuesday, 23 April 2013

Waltzingmouse Flower show CASE


Today we are CASing cards from the recent Waltzingmouse Flower Show.

 I knew when I was looking through the cards that I wanted to CASE JJ Bolton, and had trouble choosing between the two cards she had made, but eventually I settled on the vellum one.

  here is JJs original here


I started off by stamping the main image from Folk Medallions in a rainbow of colours (I do love rainbows!). I then cut a circle in the centre, using circle nestabilities, which would make the centre of the card visible.
I stamped a red medallion onto a piece of white card which would sit inside the card underneath the main medallion and be seen when the card was closed.

Here's how it is when it's open. You can see some of the glitter in the vellum too.
I used my silhouette to cut the black cardstock to the shape of the medallion.


Here's how it looks when its closed.


I added some Fantastic Ribbon rainbow ribbon and a Paper Smooch sentiment (Simply Said) which was stamped in versamark and used Wow extra fine white embossing powder.

Here you can see the inside of the card with the small medallion.

I hope you like my take on the original :)

Monday, 4 February 2013

Less is More Kraft and Cream

To celebrate the 2nd Anniversary of the Less is More challenge there is a Kraft and Cream theme. I love Kraft, and I love CAS, so this was always going to be easy!


The stars are cut from handmade cream paper using my cuttlebug star die cuts. The sentiment and the stitching was stamped in versamark and then heat embossed with white embossing powder. Both stamps are from the Stampendous Ribbon Build a Border set.

This card is also being put forward for

Thanks for your comments.

Thursday, 24 January 2013

Pierre Dog Card


Here is a card I made for the daughter of a lovely friend of mine. They have a gorgeous sausage dog called Eddie, and I knew I had to make this with the free digital stamp over on Kirstys blog.
I used my Digital Scrapbook Artist software to transform the stamp into a repeated background for the card. I also printed him off to colour with my promarkers. I love the yellow and brown colour combo with the hint of red. I hadn't intended cutting him out, but my promarkers bled around the lines so I didn't have a choice!
I layered it onto some burgundy card and then some mustard yellow card to match his stripey jumper. I stamped the sentiment in versamark and embossed with black embossing powder. Some ribbon and bling finished it off.

Make sure to grab Kirstys freebie images before they disappear, they're only there for a limited time!


Thursday, 10 January 2013

Lego Star Wars Card

 It was my cousins little boys 5th birthday, and he is a huge Lego Star Wars fan, so I thought I had to do him a card with Lego Star Wars on it.
I went and googled Lego Star Wars colouring pages and managed to get a black and white image that I liked, printed it off and used my promarkers to colour it. I used my Banana Frog Retro Space set for the stars, and my Stampendous Ribbon builder set for the sentiment. I used versamark ink and superfine white embossing powder onto black card. I layered up onto some red card and then onto a white 5inch square card base.

Friday, 14 December 2012

60,000 views and my Christmas Cards

This week was quite momentous, as I reached 60,000 views on my blog! I am astonished that in the past 2 years I have had anything like that number of visitors, but I know its primarily down to two posts! One with a cupcake wrapper template, and one with a Union Jack template I created about the time of the Royal Wedding, which was also really popular this summer for the Olympics and Queens Jubilee. I'm hoping to add some extra templates to the cupcake wrapper page soon with printable wrappers I have designed, so hopefully it will continue to be popular.


This week I have mostly been getting sorted for Christmas, baking Christmas cakes, making cards, planning church events. I have to say that I only ever make handmade Christmas cards for immediate family and very close friends. This year I have made 11. I buy a box of cards for all my other cards and try to personalise them a bit with a verse of scripture, but that's my limit for the other 50 or so cards!

I have been so excited to use the wonderful Papertrey Ink set, Star of Wonder, which I got for Christmas last year and I have not been disappointed. The set has 3 main circular images, and I chose the manger scene for this years cards (I can save the other two for future years!). I wanted a verse of Scripture, and recently bought some Nina B Layers of Colour Christmas verses. I chose a suitable verse and stamped directly onto the kraft card base.


I stamped my circular image onto white cardstock using, then used distress inks (antique linen, tea dye and walnut stain) to add some colour to the image. I cut it using my spellbinders circles and layered onto a sun style die cut from Nellies dies - Multi frame Die Star #2, cut from bronze cardstock. I then layered this on to a labels 1 or labels 4 die cut, both stamped with a music background and heat embossed with gold embossing powder. Some gorgeous brown ribbon from Fantastic Ribbons finished it off really well.


I'm entering these cards into the Addicted to Stamping Bingo
This qualifies for the middle row, Ribbon, FREE (Sponging) and Embossing.

Its also being entered into Young Crafters Unite Challenge #16 - Happy Holidays


Tuesday, 30 October 2012

Embossed wedding card

I'm sorry I have a bit absent from here recently, but I have been up to lots of different things, more of which I can reveal in a week or so. For now I have a card I made for my mother in laws wedding in September. I wanted to stick to a classic white/ivory colour scheme, and I think embossing always looks classy. I CASE'd a card from Colleen Dietrich here which I had seen earlier in the year and just loved. I cut some circles from some centura pearl card using my circle nestabilities and then embossed them and inked the edges with some    antique linen distress ink.

I had some chipboard alphabet letters, but they were a glossy burgundy colour, so I versamarked them and then used some white embossing powder on them, then inked them up also. The small frame was cut out using my nestabilities labels 1 dies from a white card, I stamped some nice classic liberty type images and used white embossing powder on them, and then sponged the rest of the card leaving the flourishes as a contrast. I even added some bling to the corners of the label which is really out of my comfort zone!


Finally I added an embossed strip which was layered over some ivory ribbon and layered them all onto an A5 white card base. 

Thanks for visiting, come back soon!

Monday, 1 October 2012

Baby Boy Card

Here is a baby card for some friends for the birth of their little boy Jake.
I started off by cutting and embossing a Labels 1 spellbinders nestability with the Cuttlebug New Baby embossing folder. I did this onto some baby blue card and then sponged with Broken China Distress ink. Next I cut and embossed a Labels 4 nestability in white card and using a grid mask, and again sponged with Broken China ink.  I used some chipboard letters to spell out his name.

The card blank was stamped directly with a plaid/check from the Waltzingmouse Offbeat Backgrounds stamp set (Whispers Starry Starry Night ink). I used some teal blue felt for some of the embellishments, cutting them was really easy with my cuttlebug, much easier than I anticipated, although I wouldn't try an intricate pattern. The first was a scalloped piece (Spellbinders Scalloped edgeabilities) and then I did a small cuttlebug star. To personalise the card a little more I added the little circle sentiment and the date of birth using my Papertrey Ink Postmarks set.


Thursday, 20 September 2012

Baby girl card

Here is a card I made for friends when their little girl was born. Its alot more fussy that my usual style, but I think it works for this card. I started by cutting and embossing a large Labels 1 Spellbinders nestability and its embossed with Divine swirls embossing folder. I then did the same for a medium sized Labels 4 nestability and a polka dot mask. The labels 1 was then sponged with Colourbox Pink ink, and the Labels 4 was sponged with Memento Angel Pink. I added some Stampendous spots down the sides of the cards, used a flourish in the background in a subtle pink (My Minds Eye -Wild Asparagus) and also stamped a Tonic Buttefly punch with some script from the same set. I spelled out the name of the baby using chipboard letters  and then added the fantastic pink polka dot ribbon.


Tuesday, 18 September 2012

Waltzingmouse September Blog party - part 2

Blog-Party-Logo 70%25


So inspired was I by all the amazing fall cards using teeny trees that when I needed a quick birthday card today that was the first thing I reached for, making this very quick and easy card. All you need is an embossing folder for the background, some labels die cut (nestabilities labels 4) and stamped with a sentiment and lots of leaved in fall colours. Et voila!

Tuesday, 17 July 2012

Waltzingmouse Blog party - The Great Outdoors

Blog-Party-Logo 70%25
Welcome to this months Waltzingmouse blog party where the theme is The Great Outdoors, I immediately thought of my teeny trees set, but didn't just want to do some trees. When I hear the phrase "great outdoors" it always makes me think of camping, and what says camping better than a camp fire!!


Some clever use of teeny trees was needed to make the camp fire, and some obligatory marshmallows!

I've shown some of the stamps I used to create the camp fire.


I also stamped the stars, moon and marshmallows in versamark and heat embossed in white. (the moon was the circular stamp which was masked with a 1.5inch circle I had cut out).
I then sponged the top of the picture in cracked sapphire distress ink and the bottom is both walnut stain and forest moss. 
I finished off the card with a hand written sentiment on a mini banner,


To see what other people came up with for this theme pop over to the waltzingmouse website!