Tuesday 17 December 2013

Fall Leaf Wedding Cake

When one of my best friends asked me if I'd be able to help her with her wedding, I automatically thought she wanted me to make her wedding stationary. However, she had something else in mind - Cakes!
Having never made anything more than a birthday cake I was a little apprehensive, but am always up for a challenge. Part of the challenge also lay in making 2 wedding cakes (a brides and a grooms cake) and 120 cupcakes...oh and they only had to be taken 200 miles to the wedding!

Here is the wedding cake she requested.

I cut all the leaves using some cutters I found at Windsors Cake Craft in Warrington, and I then used my wonderful PTI Leaf stamps to imprint them. (I placed cling film on the stamp to make it food safe!)
I then painted them with food colouring to be the fall colours

Here they are drying on my dining table!

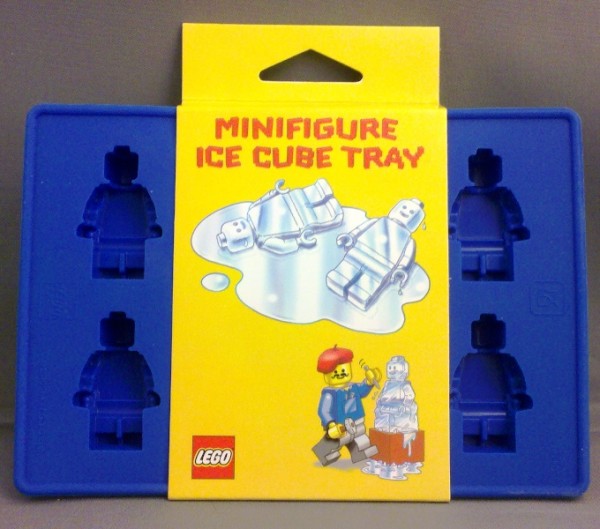
And here is the complete display of all the cakes and cupcakes I made for the wedding, including the Lego wedding cake you can see further down here on my blog.


Finally, here is the happy couple cutting the cake!

Saturday 7 December 2013

Face Painting Party Day

Today has been crazy busy. This morning was our kids church Christmas party, and this afternoon was my nieces birthday party. Since I bought some face paints at Easter I've been looking for opportunities to practice with them, and today two came at once. This morning I did some painting for the Preschoolers at our church party, and this afternoon I painted for a reception class! At the party this afternoon I thought I was going to have a quiet time, as it took at least 10 minutes for anyone to come over and ask for it to be done, but from that point on I didn't stop for 2 hours!
12 Hello Kittys, 10 butterflies, 5 foxes, 3 batmen, 2 supermen, 1 spiderman, 1 superhero and 1 princess later I was able to enjoy a piece of cake and a cup of tea!
Here's my little fox

And the beautiful birthday princess
and another action shot.

I hope you like my lovely Christmas jumper my honey bought me this week from Primark!

Thursday 5 December 2013

Irish Red Setter Silhouette Card

My father in law recently got a little puppy. I say little puppy, he won't stay little for long as he's an Irish Red Setter, and they grow to be pretty big!
We wanted to go down and visit them whilst the puppy, Finn, was still small to let our boys get used to him, and he them. You'll see some pictures further down.


For my father in laws birthday I thought I would tie in the new member of the family and used my silhouette to cut a cute red setter. I also used my silhouette to cut out a matching sentiment.

I looked through my 6x6 papers and found 4 that had similar orange/red tones which would work with a red setter. Some of the papers are Basic Grey, but unfortunately all my papers are loose and mixed up, so I couldn't tell you which!
Amazingly this is another card without a single bit of stamping!


Here's Finn with my lovely hubby, and then here is my Monkey being licked by Finn! Monkey is a little scared of him still, and this was really funny watching him try and avoid being licked!!
When we visit again at Christmas I'm sure he'll have grown loads!

Thursday 28 November 2013

Baby Boys cards and Gifts 2

We seem to know lots of people having Baby boys recently, and not being one to make identical cards I made variations on a theme for each of them. The main theme was a Silhouette cut name (my preferred font is Segeo Script as it welds really well for cutting), ribbon strip, sentiment and stamped background in matching colours. 
The first card is a stamped gingham background and little punched footprints. I even added tiny star button embellishments to the name for extra depth.

Stamps: Waltzingmouse Offbeat background, Hero Arts Baby sentiment
Ink: Broken China Distress ink
Embossing folder: Swiss dots
Ribbon: Fantastic Ribbons Organza Aqua dots
Card base: White A5

The second card follows many similar ideas. I stamped a background using the concentric circles from the Waltzingmouse Teeny Trees. I did it by eye as I was in a rush, but it is better if you measure out the circle centres properly. If you have a gridded acrylic block its definitely possible to do this by eye like I did.

Stamps: Waltzingmouse Teeny Trees, Hero Arts Baby sentiment
Ink: Broken China Distress ink
Embossing folder: Swiss dots
Ribbon: Fantastic Ribbons Organza Aqua dots
Card base: White A5
This third card I didn't use a stamped background, but used a That Special Touch of Mica mask and sponged it.

Stamps:  Hero Arts Baby sentiment
Ink: Broken China Distress ink
Embossing folder: Swiss dots
Ribbon: Fantastic Ribbons Organza Aqua dots
Card base: White 5" square


This final piece is a gift I gave to some friends whose little boy was being dedicated. I made each of the cut files and combined to create this image which I framed.

Saturday 23 November 2013

Yum Yum Sticky Buns

My default setting when I got the TV to myself used to be Create and Craft. Unfortunately recently 9 times out of 10 the stuff they show isn't really my style, and so I end up switching straight over to my new default - Food Network!

My favourite shows are Man V Food, Triple D, and Barefoot Contessa (and Cupcake Wars when its on).

Last week I saw an episode of Barefoot Contessa where Ina made some glorious looking sticky buns, something I've been meaning to make for a while.

So I headed out and bought myself some ready rolled pastry - yeah, I'll get round to making my own puff pastry one day, but not today!

It sat in the fridge for a week as we had pumpkin pie in there that needed eating - remind me to tell you that story another time! - until I had some other things to bake and remembered those sticky buns were calling!

They are so easy to make, have very few ingredients, and literally take 35 minutes from start to finish.

Go and get Ina's recipe from Food Network and give these a try. I can feel my clothes tightening as I even think about how many I've eaten these past 2 days!

Wednesday 20 November 2013

Fall Leaves Wedding Card


Here is the wedding card I made for one of my best friends who recently got married. She wanted a vintage Autumn theme wedding, complete with Fall Leaf cake and all the vintage extras. I decided to make a card which tied in with both these things. I think the little love birds in the tree work well for a wedding card, but this card could easily be adapted to have 1 or no birds in the tree, and with an alternative sentiment.


I even used some of my precious Nana's buttons from her button tin, but they definitely set the card off.

Stamps: Waltzingmouse Teeny trees, Papertrey Ink Leaf prints
Ink: Tim Holtz Distress inks- Tea Dye, Antique linen, Spiced marmalade, Barn Door, Walnut stain
Twine: Fantastic Ribbons Gold and Ivory Bakers twine
Card base: Kraft 6" square

Please let me know what you feel about my alternative style wedding card!

Tuesday 19 November 2013

CAS summer Thank You card


A simple yet classy card to say thank you. A little bit of embossing goes a long way, especially on white card, and swiss dots is one of my favourite embossing folders.
As you may realise, green is my go to colour, and this great polka dot washi tape from Fantastic Ribbons really works well.

Stamps: Waltzingmouse Country Labels 4
Ink: Memento Black, Bundled Sage Distress ink
Dies: Spellbinders Labels 4
Embossing folder: Swiss dots
Washi tape: Fantastic Ribbons Green Polka
Card base: Cream A5

This is being entered into the Lawnscaping Challenge #70 - Polka dots

Sunday 17 November 2013

Lego Brick Wedding Cake

When one of my best friends asked me if I'd be able to help her with her wedding, I automatically thought she wanted me to make her wedding stationary. However, she had something else in mind - Cakes!
Having never made anything more than a birthday cake I was a little apprehensive, but am always up for a challenge. Part of the challenge also lay in making 2 wedding cakes (a brides and a grooms cake) and 120 cupcakes...oh and they only had to be taken 200 miles to the wedding!

Here is the Grooms cake, as per request I made a Lego Brick cake (It was vanilla sponge with buttercream and raspberry jam) and made fondant lego wedding figures of the bride and groom.

I piped the lego logo onto each brick top as each lego piece has.


To make the fondant figures I started with a lego ice cube tray and placed yellow fondant in the head and hand locations, and then either black or white fondant where the clothes would be. I put them in the freezer to make them easier to remove from the mold, as the fondant alone wouldn't have come out cleanly other wise. I made 8 different figure (4 of each) to have more choice of which ones turned out best. Once they had dried for a few days out on the side I added the features using a food colouring pen and the hair, tie and lapels and wedding dress using extra fondant. 
The cylinders on the top of the cake ended up being Oreos covered in icing, as my sponge circles cut from an extra cake I made crumbled into a thousand pieces when I tried to butter cream them!

I added Trex to my fondant to make it look nice and shiny like a plastic lego brick, I think you can see the shine on the picture above.

I hope you like my Lego wedding cake!

Saturday 16 November 2013

Cappuccino Cupcakes and Swiss Meringue Buttercream (SMBC)

Today I made some De-licious Cappuccino cupcakes for a cake sale to raise money for a Christian charity called Caring For Life.

Because I like to stick to my old favourite cupcake recipes most of the time I usually do vanilla, lemon or chocolate, but I decided to step out of my comfort zone and do something a little different. Cappuccino cupcakes!

I have a great Cappuccino cake recipe that has a white chocolate frosting, but its a loaf cake, and a bit heavier than the texture I like to have for cupcakes, and the topping is quite thick. I decided to lighten it up with some Swiss Meringue buttercream.

Now I've only made the swiss meringue buttercream once before, and I didn't really like it that much, but I've used the same method to make some meringue which doesn't need cooking for a number of other recipes. I found a great blog with a very comprehensive recipe, (she gives all the hints and tips I've ever heard about doing this all in one place). Go over to Happy Cakes Bakes for her top advice and recipe.

Unfortunately I didn't take the advice of using fresh eggs, so my first batch didn't whisk up at all. After sending out my husband to the shop for more eggs I successfully made a batch of coffee flavoured SMBC. It was AMAZING! Its so light and fluffy, my son described it as marshmallow icing, which it really does taste like. The thing I like most about it is that its not at all sickly sweet as it takes much less sugar than normal butter cream. I think looking back I probably used salted butter the first time I made it, which is possibly why I didn't like it.

Now I admit it is alot more effort than standard buttercream, but I really believe its worth it.I also worked out it has, surprisingly, slightly more calories per cupcake (about 25) and does cost a little more - again this surprised me as you only need granulated sugar, but the butter content is higher.

All in all you HAVE to try this buttercream. I'm looking forward to doing some nice piping work with this as its SO smooth, but I ran out of time after my egg mishap and just piped blobs on top and sprinkled with chocolate powder. Amusingly I made a fatal error with my first two cupcakes. I was in such a rush to get out the door I picked up a small pot of ground black pepper instead of the chocolate powder, and had liberally covered 2 with pepper before realising!!! Maybe I could have created some inspiring new flavour, but I didn't wait to try them and scrapped the icing straight off and set them aside for my husband!

Friday 18 October 2013

Moses parts the Red Sea Cupcakes


Apologies that I have been absent from the blog a lot recently. Now I'm back at work I'm struggling to fit in blogging. Add to that a busy time at church, making a wedding cake for my friend, and that really leaves no time at all. It's not that I haven't been crafting, I have, but getting the time to sit down, sort photos and then blog about it is a struggle.
Here is a quick post to show some super cute cupcakes I made for my Sunday School class when we were doing about Moses parting the Red Sea!
A simple vanilla cupcake with some blue buttercream piped down the sides to be the sea being held back by God and a tiny Wilton gingerbread man decoration for Moses. The kids (and adults!) really liked them. I promise once things calm down I'll be back posting about all my recent crafting!

Saturday 5 October 2013

Give Thanks to the Lord Cherries Card


This was a card I sent to Lebanon with a care package of the new Cadburys marvelous creations chocolate for a good friend of mine who is out there helping engineer some projects.

We met when we were both 18 and taking a gap year before university and doing a Year in Industry at different engineering companies, but right next door to each other. Why did we hit it off? Because we both had WWJD bracelets on and had an instant connection.

I was excited to break out my Country Labels 4 stamps again, and especially these super cute cherries.
I stamped the background cherries using Memento Lady Bug ink and pearlised green ink. I used the same green to stamp the labels 4 shape and also on a scrap of card I stamped an extra cherry to fussy cut to embellish. I cut the labels 4 with my Nestabilities die, and a larger one to layer onto which I embossed with Cuttlebug swiss dots. Some lovely dotty ribbon and  layered onto black card and it was finished!

Wednesday 18 September 2013

New York Silhouette Skyscape Wedding gift

Here's a paper cut I designed for a very good friend of my DH.

The New York theme is because he proposed there.


I bought the main background file from Silhouette Store, and then made some alterations to it on the silhouette software to adapt the buildings and the windows. I added in a heart shape to the windows on one building.

The bride has a couple of cats, so I sneaked one under the Brooklyn bridge, which I designed the cut for using a photo from google.

Here are wedding rings and love birds, and this shows the dimension I got between the black and grey.

And finally the good old Statue of Liberty! I bought this from the silhouette store too.

I hope you like this, I was please with how it all worked together.

Wednesday 4 September 2013

Peter Rabbit First Day of School


This week was my son and nieces first day of Primary school. The card I made for the Waltzingmouse Pajama party here I gave to my son. For my niece I cracked open a new stamp set from Crafters Companion and printed this Peter Rabbit, and coloured with Promarkers. I used my Country Labels 4 stamp for the mat, and also the tiny apple stamp from Teeny trees for my background (I thought it tied in well with the school theme). I cute the mats with Spellbinders Labels 4 and embossed with some circles. Some tiny buttons to embellish it finish it off.

This card is being entered into the Waltzingmouse Bedtime Story Sketch
PAJAMA-PARTY-sketch-2

I hope you like, and please go look at the other entries into the sketch challenge.

Friday 30 August 2013

Waltzingmouse Pajama Party

PAJAMA-PARTY-LOGO


I'm excited to be taking part in this months pajama party, especially because I wasn't sure I'd be able to play along, partly due to time constraints, but also because at first glance I couldn't come up with anything for the 4 categories. In actual fact I started to come up with an idea, and it led me to try and incorporate all 4 challenge themes in one card!

The themes are:
1. Tie a knot in it
2. Get Nauty(cal)
3.  Colour inspiration
4. Golden Oldie stamp sets.

So here's my card

So here's how I did it.
I stamped the cloud shape in versamark, from my oldest WMS set,(the awesone Teeny trees!) I think its a tree outline, but it makes a great cloud!  I heat embossed with white embossing powder to act as a resist to the blue ink I sponged for the sky. 

I used my Silhouette to cut the pirate ship(I bought the file from the silhouette store), and then stamped some detail onto the ship using an Offbeat Background stamp to look like planks. I also sponged the sails and added the pirate detail to the flag. 
I cut some blue paper with Spellbinders edgeabilities scalloped borders and then stamped onto it with another Teeny trees stamp to give a wave effect.

I added some extra details with a burgundy crows nest, some Card Candy gold port holes and a hand made anchor.


Here's how I met the challenge themes:
1. Tie a knot in it - My anchor is hand made from silver wire and twisted and knotted. It took me a couple of attempts to get it to look like this!
2. Get Nauty(cal) - The pirate theme!
3.  Colour inspiration
4. Golden Oldie stamp sets. - My oldest WMS stamp set is Teeny Trees.

I hope you have enjoyed seeing what I created, I love to hear your feedback. If you'd like to see what everyone else made pop over to the Waltzingmouse blog.

Thursday 15 August 2013

CAS Anniversary card


This is my CAS anniversary card for my husband for our 9th Anniversary (9 hearts!). I'm lucky that my lovely husband loves the CAS style, so I don't have to spend hours slaving over a card for him! In fact this one was super quick once I'd decided what I wanted to do. I was inspired by this image which I have on one of my pinterest boards, and knew if I made it with 9 hearts and 'love' it would be perfect. It was so easy to do on my Silhouette Portrait. I raised the top layer off the red card to give it some depth.


My husband loved it, hope you do too :)


Sunday 4 August 2013

Cbeebies Mr Tumble Card

Today is my little man's 4th birthday! Here is the card I made to send to the BBC for their Cbeebies channel.
Its done to look like Mr Tumbles spotty bag, and has images from Octonauts, Chuggington, Tree Fu Tom and Number Jacks on it.

There he is, under the 4!

Unfortunately they can't show every card that gets sent in, so its a bit hit and miss. Last years card was a miss, which when you've spent hours making it, and spent about £5 sending it comes as a bit of a blow (especially when you have a little one waiting expectantly by the television!). Here's hoping it gets shown!

Thursday 1 August 2013

Happy Everything Goes!


Here is a card I made for my sister in law whose birthday is tomorrow. After being inspired by the recent Pajama party to use my Folk art medallion set with some vivid colours I set about finding the perfect combination of colours. After some experimentation I decided to go for Distress Inks in Seedless Preserve, Forest Moss and Chipped Sapphire.


I took the tiny pennant from the set and stamped along the central section with alternating colours.
I also embossed some purple card with Swiss dots and stamped an extra medallion and some leaves for embellshmenst. Finally the sentiment is Paper Smooches from the set Simply Said.


I'm entering this into the Waltzingmouse Pajama Party Bedtime story sketch


and the Paper Smooches Anything goes challenge