Showing posts with label Cakes. Show all posts

Tuesday, 2 September 2014

Wallace and Gromit Were-Rabbit Birthday Cake

I have been terrible at updating my blog recently, but I needed to share this.

My lovely Monkey turned 5 recently, and he requested a Curse of the Were-rabbit cake, as he LOVES Wallace and Gromit. Now the only problem with 4/5 year olds, is that they believe that whatever they ask for can be magically created (and I always try my best to magically create!).

So here is the cake.

Gromit and Wallaces' head are both modelling chocolate (which I made, and I'll post the details and photos later) and the rest is fondant. The cake (at Monkeys' request) was Vanilla sponge, strawberry jam and chocolate buttercream.
I want to add more photos to this post when I get round to it!

Sunday, 5 January 2014

Favourite crafts of 2013

I apologise that my blogging towards the end of 2013 was so sporadic, but I was super busy with work and church, so although I did craft, I just didn't get round to blogging. Infact, some of my favourite cards I haven't even posted yet!
As you will see, if you compare my top picks from this year with last years, paper cutting on my silhouette features hugely this year. I still LOVE stamping, but like to combine it with paper cutting too. I've still been making lots of cakes, but again, haven't had to chance to post them all yet.
I got various craft gifts for Christmas, and can't wait to get some extras I ordered post Christmas with my birthday/Christmas money. Baking featured heavily in my presents, and I'm excited with what I might create this year! I'm not one for New Years resolutions, but I am hoping to make more time to blog and create this year. I need to be super organised with my time, but hopefully will do it!

So here are my top picks from 2013!

My design for a valentines card for my friend Stacey...who you will see later got engaged and then married!

I loved making this card from wallpaper, and that amazing mannequin cut on my silhouette. 

I love this wallpaper card too, and that ruffle ribbon rose!


One of my favourites of the year has to be this. A play on Jurassic park for my Sister in Law.


A lovely Waltzingmouse wedding card, again vintage!


An engagement card for my lovely friend Stacey.


I enjoyed creating this design for some friends who got married in March.


Another favourite, I loved the mini playing cards (salvaged from a cracker!) and the lovely little white rabbit charm.


Elijahs birthday banner, well its rainbow coloured, so of course I love it!


This is my first layered paper cut, I love it, and had to design most of the bits from scratch.


Loved piping this Disney font for EJs birthday cake.


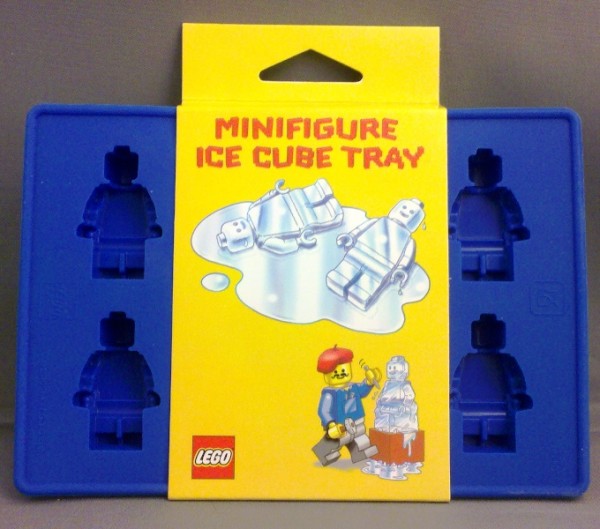
I loved making these mini lego figures for my first ever wedding cake for my lovely friend Stacey!

 And my favourite card of the year??

Ta Da!


I loved making this card so much. It combines almost all of my card crafting techniques (Stamping, embossing, cuttlebug, silhouette, layering, sponging, wire twisting, you name it, its on this card!).
I'm so glad it was a card for Joey, and plan on framing it!

I hope you like my top picks from 2013, just click on a photo to go back to the original post.

Happy New Year!

Tuesday, 17 December 2013

Fall Leaf Wedding Cake

When one of my best friends asked me if I'd be able to help her with her wedding, I automatically thought she wanted me to make her wedding stationary. However, she had something else in mind - Cakes!
Having never made anything more than a birthday cake I was a little apprehensive, but am always up for a challenge. Part of the challenge also lay in making 2 wedding cakes (a brides and a grooms cake) and 120 cupcakes...oh and they only had to be taken 200 miles to the wedding!

Here is the wedding cake she requested.

I cut all the leaves using some cutters I found at Windsors Cake Craft in Warrington, and I then used my wonderful PTI Leaf stamps to imprint them. (I placed cling film on the stamp to make it food safe!)
I then painted them with food colouring to be the fall colours

Here they are drying on my dining table!

And here is the complete display of all the cakes and cupcakes I made for the wedding, including the Lego wedding cake you can see further down here on my blog.


Finally, here is the happy couple cutting the cake!

Sunday, 17 November 2013

Lego Brick Wedding Cake

When one of my best friends asked me if I'd be able to help her with her wedding, I automatically thought she wanted me to make her wedding stationary. However, she had something else in mind - Cakes!
Having never made anything more than a birthday cake I was a little apprehensive, but am always up for a challenge. Part of the challenge also lay in making 2 wedding cakes (a brides and a grooms cake) and 120 cupcakes...oh and they only had to be taken 200 miles to the wedding!

Here is the Grooms cake, as per request I made a Lego Brick cake (It was vanilla sponge with buttercream and raspberry jam) and made fondant lego wedding figures of the bride and groom.

I piped the lego logo onto each brick top as each lego piece has.


To make the fondant figures I started with a lego ice cube tray and placed yellow fondant in the head and hand locations, and then either black or white fondant where the clothes would be. I put them in the freezer to make them easier to remove from the mold, as the fondant alone wouldn't have come out cleanly other wise. I made 8 different figure (4 of each) to have more choice of which ones turned out best. Once they had dried for a few days out on the side I added the features using a food colouring pen and the hair, tie and lapels and wedding dress using extra fondant. 
The cylinders on the top of the cake ended up being Oreos covered in icing, as my sponge circles cut from an extra cake I made crumbled into a thousand pieces when I tried to butter cream them!

I added Trex to my fondant to make it look nice and shiny like a plastic lego brick, I think you can see the shine on the picture above.

I hope you like my Lego wedding cake!

Saturday, 16 November 2013

Cappuccino Cupcakes and Swiss Meringue Buttercream (SMBC)

Today I made some De-licious Cappuccino cupcakes for a cake sale to raise money for a Christian charity called Caring For Life.

Because I like to stick to my old favourite cupcake recipes most of the time I usually do vanilla, lemon or chocolate, but I decided to step out of my comfort zone and do something a little different. Cappuccino cupcakes!

I have a great Cappuccino cake recipe that has a white chocolate frosting, but its a loaf cake, and a bit heavier than the texture I like to have for cupcakes, and the topping is quite thick. I decided to lighten it up with some Swiss Meringue buttercream.

Now I've only made the swiss meringue buttercream once before, and I didn't really like it that much, but I've used the same method to make some meringue which doesn't need cooking for a number of other recipes. I found a great blog with a very comprehensive recipe, (she gives all the hints and tips I've ever heard about doing this all in one place). Go over to Happy Cakes Bakes for her top advice and recipe.

Unfortunately I didn't take the advice of using fresh eggs, so my first batch didn't whisk up at all. After sending out my husband to the shop for more eggs I successfully made a batch of coffee flavoured SMBC. It was AMAZING! Its so light and fluffy, my son described it as marshmallow icing, which it really does taste like. The thing I like most about it is that its not at all sickly sweet as it takes much less sugar than normal butter cream. I think looking back I probably used salted butter the first time I made it, which is possibly why I didn't like it.

Now I admit it is alot more effort than standard buttercream, but I really believe its worth it.I also worked out it has, surprisingly, slightly more calories per cupcake (about 25) and does cost a little more - again this surprised me as you only need granulated sugar, but the butter content is higher.

All in all you HAVE to try this buttercream. I'm looking forward to doing some nice piping work with this as its SO smooth, but I ran out of time after my egg mishap and just piped blobs on top and sprinkled with chocolate powder. Amusingly I made a fatal error with my first two cupcakes. I was in such a rush to get out the door I picked up a small pot of ground black pepper instead of the chocolate powder, and had liberally covered 2 with pepper before realising!!! Maybe I could have created some inspiring new flavour, but I didn't wait to try them and scrapped the icing straight off and set them aside for my husband!

Friday, 18 October 2013

Moses parts the Red Sea Cupcakes


Apologies that I have been absent from the blog a lot recently. Now I'm back at work I'm struggling to fit in blogging. Add to that a busy time at church, making a wedding cake for my friend, and that really leaves no time at all. It's not that I haven't been crafting, I have, but getting the time to sit down, sort photos and then blog about it is a struggle.
Here is a quick post to show some super cute cupcakes I made for my Sunday School class when we were doing about Moses parting the Red Sea!
A simple vanilla cupcake with some blue buttercream piped down the sides to be the sea being held back by God and a tiny Wilton gingerbread man decoration for Moses. The kids (and adults!) really liked them. I promise once things calm down I'll be back posting about all my recent crafting!

Tuesday, 25 June 2013

Rainbow Smash Cake

When my friend who is a photographer was asking for a volunteer to have a go at Cake Smashing I have to admit I didn't have a clue what she meant, but a quick good showed exactly what it was! What do you get if you put a baby and a pretty cake together? Cake Smash!
The deal was, I make the cake, she'd take the photos, so off I set to make a cake. It had to be buttercream icing for the best mess and smash, but I didn't want it to be boring, so I searched around online and found a tutorial for a petal cake. I decided to take it to the next level and do it rainbow coloured. Here are my bags of rainbow coloured icings. You need to work on the one after the other, so I had to be careful to keep them in the right order!

You start by piping dots of each colour, the smudge them right, then add the next row, but move all the colours along one. You repeat this until it is completely covered. 

Here is the cake about to be smashed

Tomorrow I'll be showing the banner I made for the background!

Thanks to the wonderful Kirsty Wiseman for these fab images!


Sunday, 23 June 2013

My little man is 1!

Where has the year gone?! I can't believe EJ turns 1 tomorrow. We had family round today for a little birthday tea and although initially I hadn't planned to make a cake I knew I had to!
Joey suggested Mickey Mouse Clubhouse (we went to Disneyland Paris last week) but I settled on just Mickey Mouse. Not wanting to over complicate it I just made a white base and added red and yellow circles and a Mickey head. My piping is, as usual, not great, but I'm working on it!!! I even tried to do a Disney font!

Hopefully I'll post his Mickey card tomorrow, and some other fun things we did for his birthday!

Wednesday, 3 October 2012

Over the hill cake...and an upcoming project!

Here's a cake I have made this week for a friend at work who has just turned 50. He's a big walker, so this cake was ideal. The main base is a stack of 4x 8" cakes, and then a large and small cupcake are upside down on the top to form the hill. Its a vanilla cake with buttercream and jam.

Here's the main character, who is supposed to look like my friend Andy! (Although my character is a little bit chunky!)


Here's a little sheep, which I followed the fantastic advice of someone on youtube and used the thin end of a biro top to create the wooly texture, it worked brilliantly.
The grass is piped green buttercream (nozzle 233) and the path is demerera sugar.


My crafting has been a bit all over the show since Elijah was born for various reasons. The most recent being that we bought a lot of new storage, and so I've been rearranging all my craft stuff. So, instead of crafting I've been organising, but hopefully it will make my crafting tidier and also I will know exactly where everything is so I'll be quicker too!

Below is a picture of the main materials needed for a new craft I'm SO excited about having a try of. I've been getting bits and pieces in the post and finally the last piece of the puzzle as it were arrived today, so I will be having a go later on!!!! Watch this space!

Hope your day is filled with craft!

Wednesday, 19 September 2012

50th Golf Birthday Cake

Here is the cake I made for my husbands step mum this weekend. She loves golf, and supports Manchester City, so this helped decide the colour scheme.
The cake itself is a 9inch cake, and there are 4 layers of a lemon sponge sandwiched with lemon buttercream and lemon curd. I then coated the cake in the remaining buttercream and left in freezer to set before adding the green icing. I coloured the icing myself using colour pastes and ready roll white icing.


The 50 is cut with some number cutters from white icing, and layered onto some shield shapes which I had cut free hand. I modelled the golf clubs by hand and piped the sentiment. The golf flag is a piece of spaghetti wrapped with white icing so it held its shape and stood up completely straight.


The bunker is made with demerera sugar, the grass is green buttercream piped with a 233 nozzle. 

The cake went down really well, and people said it tasted as good as it looked!

Wednesday, 30 May 2012

Beehive Cupcakes

So this week is my final week at work before I start my maternity leave, and so I wanted to bake some cupcakes for my colleagues. 

My friend found this image on Pinterest and sent it to me which was my inspiration.
This is over at Sweetopia, and its meringue icing on a chocolate cupcake. I did want to do the meringue icing, but my little blowtorch is pretty pathetic, and I didn't think it would be able to cope doing this. 
I think you could cope with that amount of meringue icing, but not buttercream, so I adapted the look and taste of this to suite me!


I started by making standard size lemon drizzle cupcakes, and some tiny miniature cupcakes to bulk out the beehive and reduce the buttercream!

I then made some lemon buttercream, gently coloured. It was actually quite tricky to pipe around the mini cupcake, I kept getting gaps between the layers.

I placed a yellow sugarpaste bee on top which I'd striped with dark chocolate drizzles and almond wings.

Here's what it should look like!

And here's a bunch of them, they're not very consistent!


I'd also tried to make some decorations out of the left over dark chocolate. I'm not great at piping lettering so it was quite tricky, but the results are quite cute!


I did sneak one of the more shabby looking cakes to try, and it was delicious, but SO hard to eat, think plates and spoons/forks will be a must!!

Tuesday, 1 May 2012

May Day Panda Cupcakes

Happy May Day! Ok, so I know that May Day has pagan origins, but for me its just a day which highlights that spring is in full swing (it was glorious weather here yesterday for a change!) and in the UK signals a bank holiday! Although we have to wait for next monday for the bank holiday its also very exciting to be in the month of May as that means my baby is due next month!

Another reason I have a fondness for May day is that as a child our primary school used to do Maypole dancing, and I think we were the only school in town who had their own maypole. For weeks before we'd have to practise the different dances to make sure we knew them properly. When you dance with the coloured ribbons they wrap around the pole in a very complex and lovely pattern, each dance giving a slightly different pattern, and by the end of the dance you unwrap them. You can imagine what confusion and knots would ensue if people did it wrong!! I'm inspired to try and make a card with this as the theme!

Next I want to share with you some beautiful and fun little cupcakes me and my monkey made this weekend.  A good friend of mine put me onto a fantastic blog called Bakerella
and the most recent post was some CUTE panda cupcakes
Panda-cupcakes_3655

I knew straight away that I wanted to have a go at these, and as I was making some chocolate cupcakes for my Year 11 class anyway, I made a few extra little fairy cake sized ones to decorate. I underestimated how small the cupcakes were over on Bakerella to get the chocolate chips to be the main decorations, and I ended up using chocolate buttons instead to make ours. My monkey thought they were amazing, and they tasted pretty darn good too. I used my 'best chocolate cupcake recipe' and the hummingbird buttercream recipe. I think I need to set up a link to a post containing all my best tested recipes for easy access, but that can be a job for another day.

So how did they turn out?!
Monkey needed a little help with the icing and where the eyes should go, but he thought they were just the best thing ever!

Here's us just before he demolished this one!!
I recently bought a great book which helps you transform cupcakes into fun objects and animals, so keep an eye out for more fun baking posts!
Have a great day!

Sunday, 5 February 2012

Valentines cooking

Have you ever had one of those eureka moments when you do something, and its just amazing, you're almost shocked you've actually managed to do it yourself, combined with the fact that you're amazed how straight forward it is? Well today I had not one, but TWO of these! Both relating to baking these rose cupcakes.

The first is SUPER smooth buttercream icing. I have for quite some time been following the buttercream/frosting recipe which the Hummingbird Bakery use ( 150g butter, 450g icing sugar, 50ml milk and 1 tsp vanilla extract). I have also followed their instructions too, which is to mix on high for 2 minutes, which with a hand whisk makes your arm ache, but it always produced lovely buttercream. Then I saw a friends photo of her buttercream on facebook and it was SO much smoother than mine. How did she do it? Well I asked the question and when she said 5 minutes I thought, my arms can't take it! But in the name of smooth icing I gave it a try, and 5 painful minutes later I had the most AMAZING icing! Who knew just an extra 3 minutes mixing would make such a big difference. The second eureka moment was piping the roses. I had tried to pipe them using my usual piping nozzle, but they didn't look great, so I googled and youtubed it (well in this technological world you can find literally anything you want to online, and I did!) and I found I would be better using a Wilton 2D nozzle, which I promptly went out and bought. I think the buttercream being so smooth made a huge difference, but piping was a dream.

I'm amazed at how much like a rose they look, they are so pretty, and will be being sold next week for Valentines day in aid of the Lymphoma Association charity along with other cakes and cookies being made by my class at school.
These are just samples for our posters to promote the sale.
 
Here are some almond cookies I made and iced using the flooding technique I learned the other day over here. They could be a little neater, but for a first attempt I think they're ok! Still need to practice my icing writing technique!!! Hope you like and are inspired to try and make some supersmooth rose cupcakes!!!